Image Slider

{Simple Life Pattern Company} Holiday Blog Tour 2020


Every year, I sew up new fancy dresses for my two girls to wear to Christmas Eve mass.  This year, I'm super excited to have them finished early November!!  Of course, I have no idea if they'll have a special event to show them off, but they will be worn, even if it's just at home.  

I am super excited to kick off the Simple Life Pattern Company Holiday Blog Tour 2020.   Simple Life Pattern Company has no shortage of gorgeous patterns to select so I wanted to choose a new (to me) pattern for each girl.  Art Gallery Fabrics and Fancy Pants Fabrics generously provided all the gorgeous fabrics for the tour --- they pair together perfectly! 


I selected coordinating fabrics from Art Gallery Fabrics' Cozy & Joyful collection and fell in love with the holiday tulle collection from Fancy Pants Fabrics.  My oldest is wearing Candied Roses in Rayon and my youngest daughter is wearing Winter Wonderland in Joyful and Midwinter in Dusk from Art Gallery Fabrics and Gold Snowflake Tulle in Off-White from Fancy Pants Fabrics.


I started with my youngest daughter first.  I chose to sew Elouise's Asymmetrical Top & Dress because I really loved the bodice.  It features a delicate sweetheart neckline and has a uniquely pieced back with bow.  I omitted the asymmetrical skirt overlay to let the tulle take center stage.  


To create the skirt, I used 5 total layers.  I first cut out a lining layer from woven cotton, using the gathered vintage skirt cutting chart.  Then I cut a layer of netting -- this layer really helps the top layers stand out.  I cut this 1/2" shorter than the vintage skirt length and width of fabric (x2).  On top of the netting, I used two layers of nylon chiffon -- width of fabric x vintage length cut (x2).  Finally, the top layer is the gold snowflake tulle -- width of fabric x vintage length cut (x2).  Then I sewed up the side seams on each layer  -- for the tulle, nylon chiffon and netting layers, I used a double fold of tissue paper underneath the seams to prevent the fabric from gathering while sewing.  Gently remove the tissue paper afterwards.    I gathered each layer separately except for the two nylon chiffon layers.  The skirt has a placket which was easy to install to all 5 layers at once, but I'd recommend running your gathering thread prior to adding the placket.  I had to move all the other layers aside because I didn't think about it until after my placket was in place.  Whoops!  (Only the lining layer needs hemmed here)


The back is so pretty!  I thought the way it's pieced together is really clever and would be a great place for contrasting fabric.  I opted to keep just the bow in contrasting fabric to help in stand out.  I love the gold buttons I found which tied it all together.


I think this may be the first year her Christmas dress has sleeves.  HA!  She has really fallen in love with 3/4 sleeves this year and was happy to see the option in the pattern.


To finish out her outfit, I sewed up a Hair Bow in Mini/Piggy size from the Simple Life Pattern Company blog!  So cute and she loves having a bow on her pony tail.


For my oldest, I selected Patricia's Boho High Low Top and Dress.  Katie's pictures of it sewn up in rayon inspired me and I just had to try it out!  While my daughter is not usually one for ruffles, she approved this design and the rayon makes them really soft and flowy.    This pattern has no closures and just slips on over the head. 


I used the included skirt pieces for the dramatic high low option.  I hadn't really sewn rayon until about a month ago and while it's a bit fiddly to cut, it sews up so easily.  I really love how soft and light it is!


My daughter is excited about this dress.  Not only is it incredibly comfortable to wear, but it will last longer than the holiday season!  I think this fabric would be fabulous in the Patricia top version paired with skinny jeans too!


Time to go spread some holiday magic 💗


A huge thank you to our sponsors!!


Follow along the Simple Life Pattern Company Holiday Blog Tour 2020

❅ Monday (11/9) That's-Sew-Kari
❄ Tuesday (11/10) It's Liesel
❅ Wednesday (11/11) Kainara Stitches
❄ Thursday (11/12) SewSophieLynn
❅ Friday (11/13) Kutti Couture


{Riley Blake Designs} On Safari


My oldest is obsessed with animal prints so when I saw this new collection, I knew she needed a new addition to her wardrobe.  She's definitely a girl after my own heart.


On Safari is new to Riley Blake Designs and features 5 stunning poster prints (perfect for quilts), an equally amazing set of 4 pillow prints and 5 fun animal prints.  The poster and pillow prints make me wish I was a quilter because I really wanted to see them in person - the most gorgeous animal photos in the wild!


My daughter loves leopard print the most so she chose the On Safari Leopard Brown,


She requested a dress in mini length, so I turned back to Colmar by Little Lizard King.  I had sewed her one earlier this summer in the RBD Poplin and we both loved the outcome so I knew it'd be perfect for this fun leopard print.   I surprised her and added pockets and a matching mask!  She heads back to school, finally in-person, tomorrow!


I also added the back tie again for a bit of added interest.  I love that despite it being quilting cotton, the feel and drape of the fabric is nice and soft.  I never have to worry about the fabric being stiff or easily wrinkled.  It washes with minimal shrinking and the colors never bleed!


This dress was a big hit!  She felt confident and comfortable.  She is hoping it meets middle school dress code!!

Reach out to your favorite quilt shop or online fabric store to order your own yardage!


{Raspberry Creek Fabrics} Painted Leopard Rayon Challis


Remember my quest last week to push myself to try new fabric bases?  I'm checking off another box on my list!  Today, I'm sharing my adventures with Rayon Challis and why it's jumped high on my list of favorite fabric bases.  


This year I as chosen to be part of Raspberry Creek Fabrics {Blogging Team} and this is my first post of the year!  As I was "shopping" for my selection, I clicked over to woven apparel to see what was offered.  I was intrigued by stretch crepe and rayon challis.  I actually selected the stretch crepe but found out just after it shipped that it would be a retired print before my post was live and it just so happened the new club rayon and stretch crepe prints were loaded.   Lucky me!


The moment I saw the Black Brown and Cream Painted Leopard Print, I really didn't need to look any further.  I knew my tween would flip out for it.  In fact, I nearly interrupted her online class to show her.  She immediately knew she had to have it!!


To showcase this show-stopping fabric, she chose one of her new favorite patterns -- Marigold by Peony Patterns.  She loves the sweetheart neckline, unique puffy sleeves, fully functional front button placket and most of all, the mini length!  It's a babydoll style cut and flowy fabrics drape so beautifully from the bodice.


Rayon is one of those fabrics that I kind of built up in my mind as being way too fiddly to deal with. In reality, I knew nothing about it.  It's a man-made fabric made of natural fibers and is super lightweight.  It's has amazing drape.  It turns out, I was scared for nothing.  It sewed up easily and even cutting was no where near as hard I imagined.   I made sure to use a nice sharp needle and also turned my iron down a bit.  When I finished the dress, I just couldn't stop staring at it!  The print may be one of my most favorite prints ever.


Pretty sure my tween thinks she's one of the coolest around.  She's never lacked confidence, but it's just oozing from her in this painted leopard print.  What prints are your favorite?  Click here to check them out!

{Riley Blake Designs} Woven Wool by Stacy West


I've made it an unspoken goal this year to branch out in my fabric selections.  When I had the opportunity to sew up the new Woven Wool by Stacy West for Riley Blake Designs, I jumped on the chance!  This wool is pre-felted and ready to use.  This collection is full of 15 gorgeous solid colors and 10 prints.


I honestly had a hard time narrowing down my choice.  In the end, I chose the Woven Wool Dot Black.
When it arrived, my daughters were arguing over it so I guess I chose well!  I had visions of a fitted jacket to pair with a cream sweater and skinny jeans.  However, my daughter had another vision....


My younger daughter told me she wanted a longer coat so I had her browse my patterns and she lit up when she saw the School Days Jacket by Oliver + S.  I had picked this pattern as part of my prize from winning Project Run & Play (Season 23) so I was excited to try it out finally.  


I was actually a bit nervous to tackle this project, especially since I was using a new pattern and a new fabric base.  As I started sewing though, my fears were immediately eased.  The wool was so easy to work with!! I also love that it doesn't need prewashed!  You can immediately start cutting and sewing.


I lined the jacket in a cozy black fleece so it will carry her through our NC winters.  She's already told me she can't wait to wear it once it cools down here.  


Her smile says it all!!  While it wasn't my original plan with this fabric, I am glad I included my daughter in the design process.  She loves it and I finally got a chance to try out a new jacket pattern.  The wool is perfect for jackets, purses and more.  Reach out to your favorite quilt shop or online fabric store and pick your favorite colors!

What color will you sew first?   I'm thinking about trying the grape color next -- it's gorgeous!!
 

{Riley Blake Designs} Glohaven by Lila Tueller


My favorite fabric designer is back with another showstopping collection and it made me smile the whole time I was sewing it up.  Who can resist these gorgeous peaches on a stunning blue background?


Glohaven by Lila Tueller for Riley Blake Designs was inspired by a single peach tree in her yard and features an array of beautiful watercolor floral and peach designs.  The colorways include blue, red, yellow and white backgrounds with pops of peach, orange and greens.


The moment I saw the peaches, I knew it had to be my selection.  I envisioned a twirly, girly creation for my fruit-obsessed youngest daughter.  Thankfully, she's not allergic to the pictures of peaches!  (A couple years ago, she became allergic to all tree fruits and she loved them ALL so it's been an adjustment.)


I chose to sew Poppy by Peony Patterns because I was dying to try out that tiered skirt.  I also wanted to add the bodice flutters while my daughter would let me!  It turned out just as girly as I'd hoped. 


I love the bold contrast of the colors.  The peaches just pop off the blue -- makes me imagine that I'm lying under a peach tree and seeing the peaches against the blue summer sky. It definitely brings out the blue in her eyes too!!


Soaking in the last few weeks of summer weather.   Fall is around the corner and while temps won't cool down immediately, the days will get shorter and our lives will get busier with school.  Hopefully she'll get a few chances to wear this in the next month!  This fabric is so gorgeous and vibrant!


I knew she'd have to test out how twirly it is and trust me, this twirl is tamed down for my blog...lol  I was hoping the pettiskirt would add a buffer in lieu of the playground shorts that always go missing when we need them, but that pettiskirt joined in the fun.  HA!!  


Glohaven is now available so check your favorite local quilt shop or online retailer so you can sew some of this beautiful collection!!

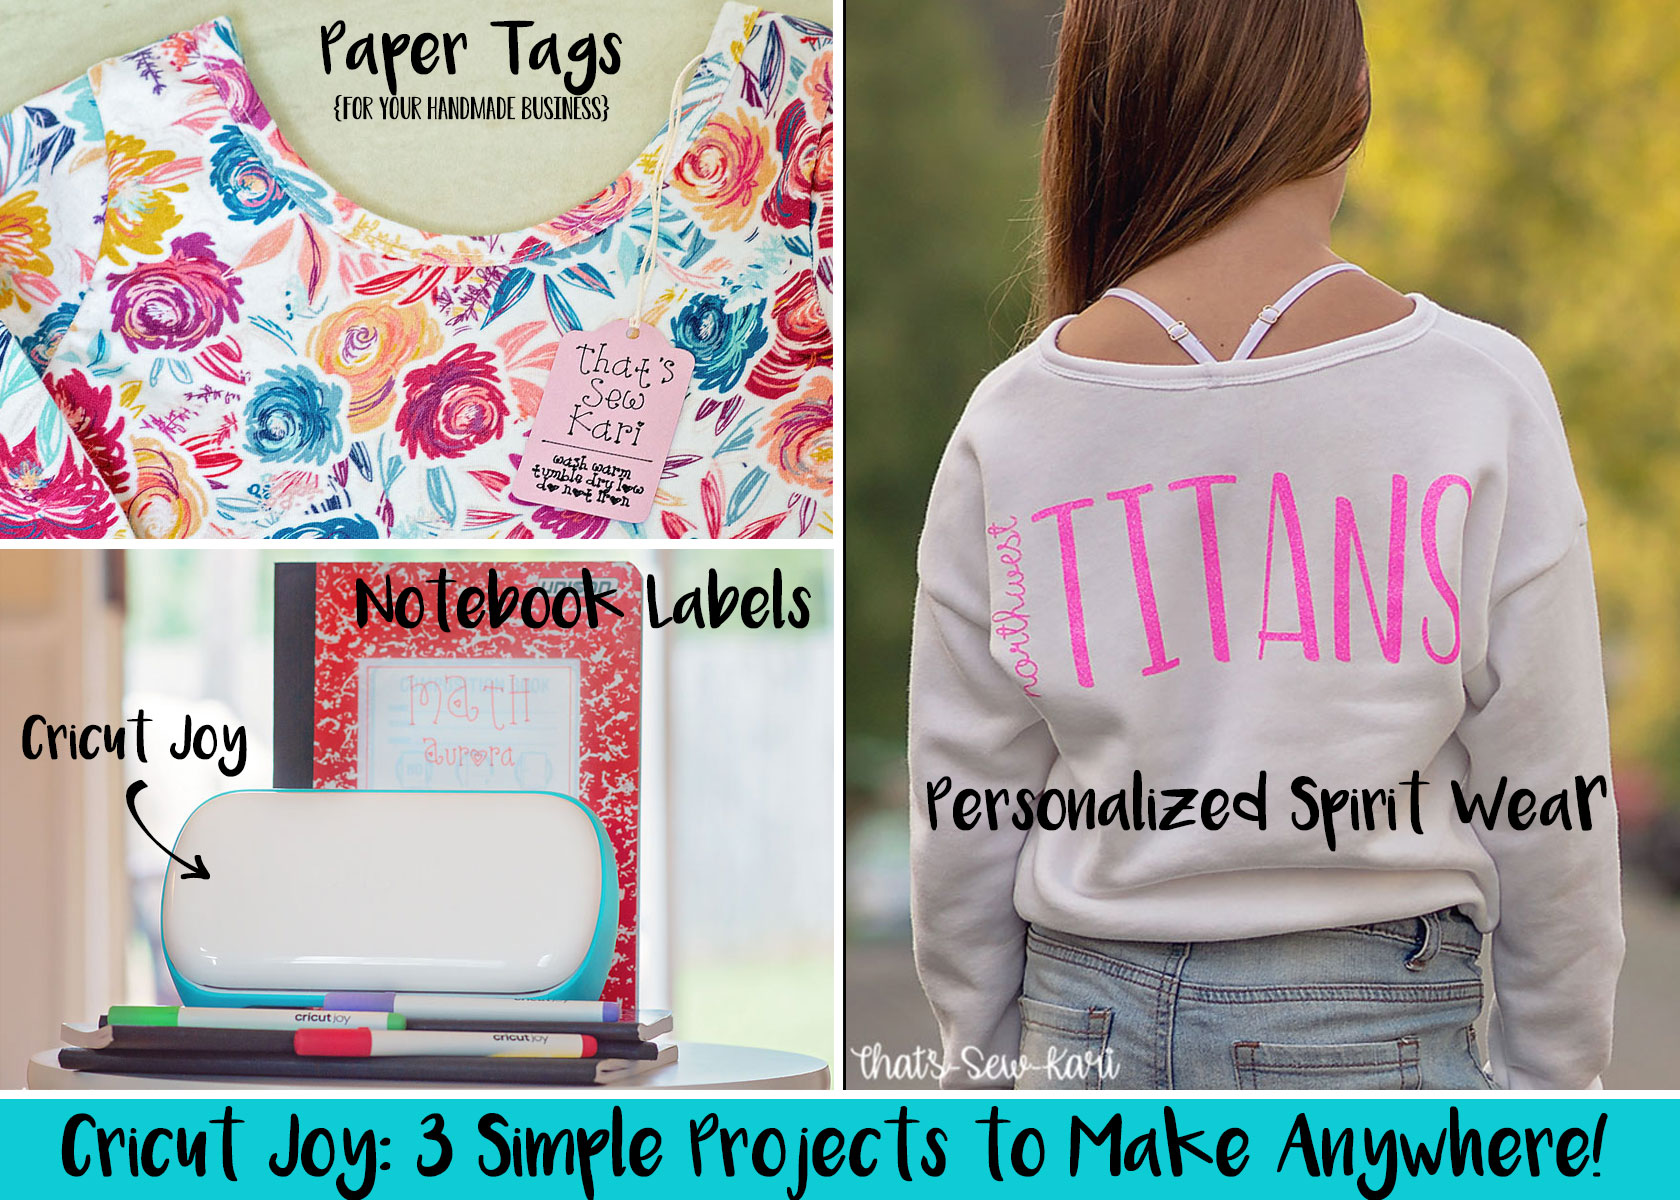
{Cricut Joy}: 3 Simple Projects to Make Anywhere!

This is a sponsored post written by me on behalf of Cricut for Cricut. All opinions are 100% mine.


Everyone needs a little JOY in their life! And Cricut is here to make it happen!!! This machine is small on size, but big on possibilities. It's the perfect machine to quickly and easily personalize anything with one cut and one color, in 15 minutes or less. It makes those little, everyday projects much easier. I already own a Cricut Explore Air 2 and a Cricut Maker, so I was curious if I really needed the Cricut Joy. Yes, yes, I do! And you do too!

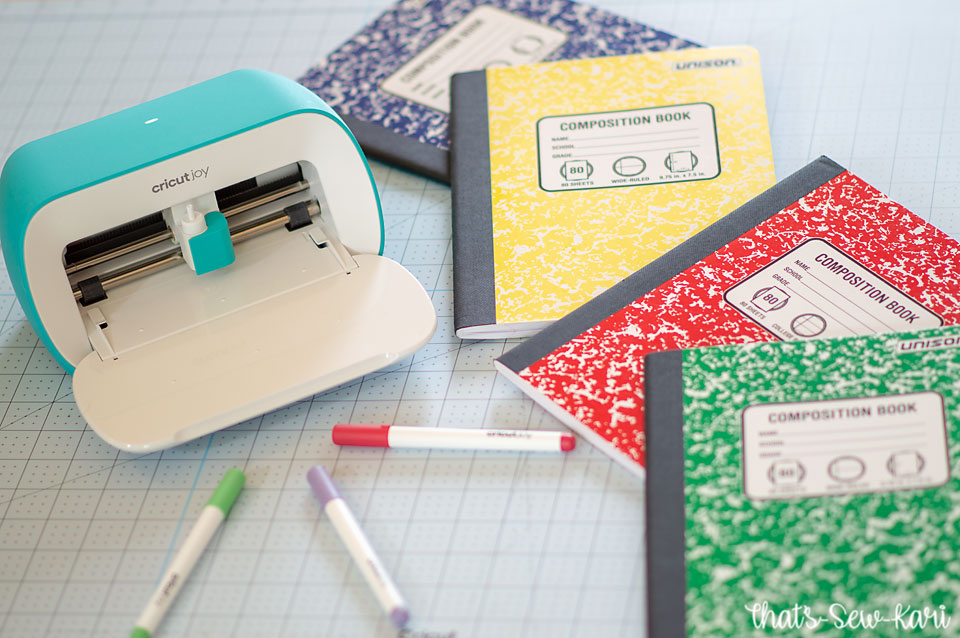
What drew me to the JOY is the portability, the possibility of extra long cuts (yay, mat-free cutting for up to 20 ft repeated cut capability!), and the fact that you can craft anywhere (all you need is an outlet). I'm a preschool teacher and for years, I've wanted to label everything in my classroom, but by the time I got home, I never got around to designing all of the needed cuts. Next week, I return to set up my classroom and cannot wait to tote JOY and do all my creating right in my classroom. It's super tiny (check out the size comparison with a standard composition notebook) and there is an optional tote bag!! It's just so easy to move from place to place without needing a dedicated craft room!

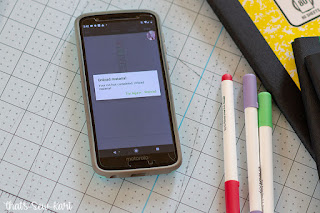
To get myself acquainted on my new machine, I came up with 3 simple projects that I cut in my living room with my phone (yay, for not being tied to my craft space and computer!) and tried out all three cutting materials: Iron-on, Paper, and Vinyl. I used the Writable Vinyl so I could test out the Joy Pens to check for smudging too!!

Project 1: Paper Tags {For Your Handmade Business}

I don't actually sew to sell, but lots of my friends do and sometimes I send out handmade gifts or just want my girls' handmade to feel a little extra special. This project is SUPER easy and takes just minutes.

  • Step 1: Open up Design Space on your computer or phone. Access the editable tag HERE.
    • Choose "Customize".
    • Edit "Your Business Name" and "Care Instructions" and resize as needed.
    • Select all layers and "Attach"
  • Step 2: Click "Make It"
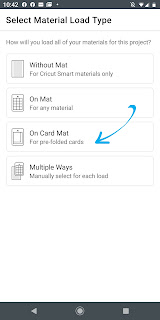
  • Step 3: Choose your "Material Load Type" (I used cardstock from one of the card kits so I chose "Card Mat")

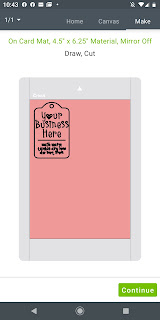
  • Step 4: Check your preview screen -- everything should be on the tag. Click "Continue".

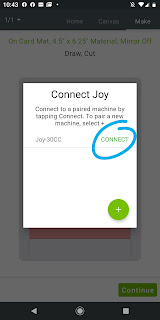
  • Step 5: Connect your Joy by choosing the green "Connect" next to your Joy machine's name.(Make sure your Joy is plugged in and front cover open)

  • Step 6: Choose your Cricut Material.
  • Step 7: Load Material and Tool as instructed on screen and press "GO".
  • Step 8: Change Tool as instructed. Press "GO".
  • Step 9: Choose "Unload" on screen, remove from mat. You're done!

Project 2: Notebook Labels

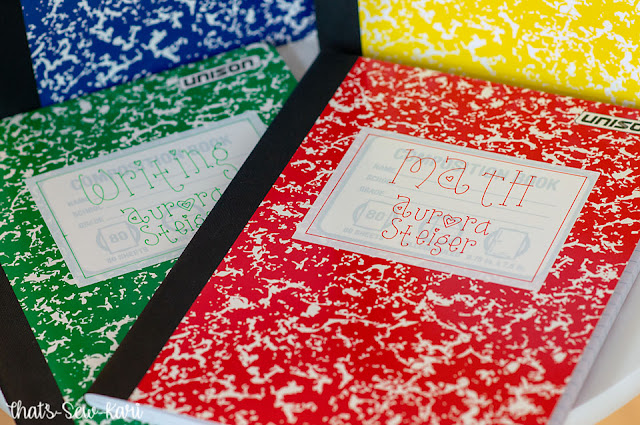
I always love sending my girls to school with Cricut-labeled notebooks, but occasionally after the notebook is handled on a daily basis, they miss a letter or two. I was intrigued by the Smart Label Writable Vinyl so I gave it a try! It actually turned out SO easy and I didn't need to mess with any transfer tape! Just peel, stick, and go! I also loved that I could have the Cricut Joy write everything out for me and it doesn't smudge. I used the Cricut Joy Fine Point Pens 0.4 which allowed me to color coordinate the ink with my daughter's notebooks. (I'd suggest a solid color notebook, or place a square of permanent vinyl underneath if using over the pre-printed composition notebook label).

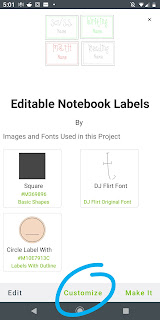
  • Step 1: Open up Design Space on your computer or phone. Access the editable labels HERE
    • Choose "Customize".

    • Edit "Name" and/or "Subjects" and resize as needed. An alternative circle label is a hidden layer. Unhide to use.
    • Select all layers for each label and "Attach". Repeat with the remaining labels.
  • Step 2: Click "Make It"
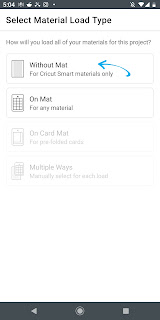
  • Step 3: Choose your "Material Load Type" (I chose "without mat" since I was using the Smart Labels)

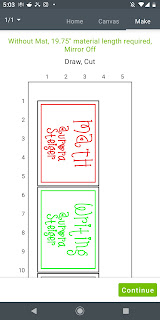
  • Step 4: Check your preview screen -- everything should be on each label. Click "Continue".

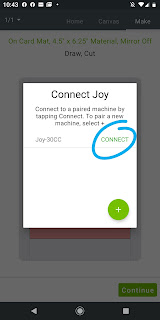
  • Step 5: Connect your Joy by choosing the green "Connect" next to your Joy machine's name. (Make sure your Joy is plugged in and front cover open)

  • Step 6: Choose your Cricut Material.
  • Step 7: Load Material and Tool instructed on screen and press "GO".
  • Step 7: Change Tools as instructed. Press "GO".
  • Step 8: Choose "Unload" on screen, peel label and stick on notebook. You're done!
    • Tip: To avoid bubbles on larger layers, apply from one side slowly until it's all applied.


Project 3: Personalized Spirit Wear

  • Step 1: Open up Design Space on your computer or phone. Access the project HERE
    • Choose "Customize".
    • Resize as needed.
  • Step 2: Click "Make It"
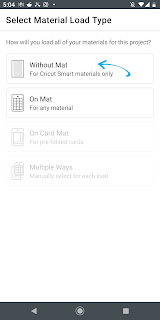
  • Step 3: Choose your "Material Load Type" (I chose without mat since I was using the Smart Iron On)
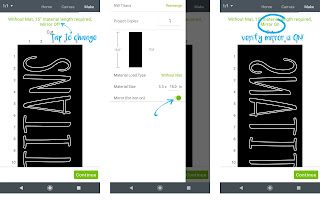
  • Step 4: Check your preview screen -- Make sure you turn on "Mirror Image". Click "Continue".
  • Step 5: Connect your Joy by choosing the green "Connect" next to your Joy machine's name. (Make sure your Joy is plugged in and front cover open)
  • Step 6: Choose your Cricut Material. (I used the Smart Iron On Glitter)
  • Step 7: Load Material (shiny side down for Iron-on!) and Tool as instructed on screen and press "GO".
  • Step 8: Choose "Unload" on screen, weed iron-on and apply on project using your Easy Press. You're done!
So, just to recap, this little machine has made paper tags (with added writable font), labeled notebooks so they will last all year, and turned a simple sweatshirt into school spirit wear, all projects completed in just minutes!! I've also used the Joy to make extra long cuts in vinyl to make Open House signs for my husband (real estate broker) that would normally been too long for a mat. This little machine is such a useful tool in my craft repertoire and I'm finding myself reaching for it over and over! Head to Cricut.com to learn more. The Cricut Joy is available online at Cricut.com, and online or in store at your favorite craft retailer!

Custom Post Signature
Custom Post  Signature