Image Slider

Bundle UP - A Pattern Collection: You Had Me at BG


Eeek!!  Have you seen the new pattern bundle, Bundle UP, coming Saturday to Pattern Revolution - it features 11 popular designers of PDF patterns.  My first introduction to the world of PDF patterns was none other than Brownie-Goose last year with her Summer Sailor Shorts pattern.  It seemed only fitting to try out her newest pattern - the Bay Dress & Top - debuting Saturday with the start of the Bundle UP sale.

Let me tell you, it's swoon-worthy, for sure.

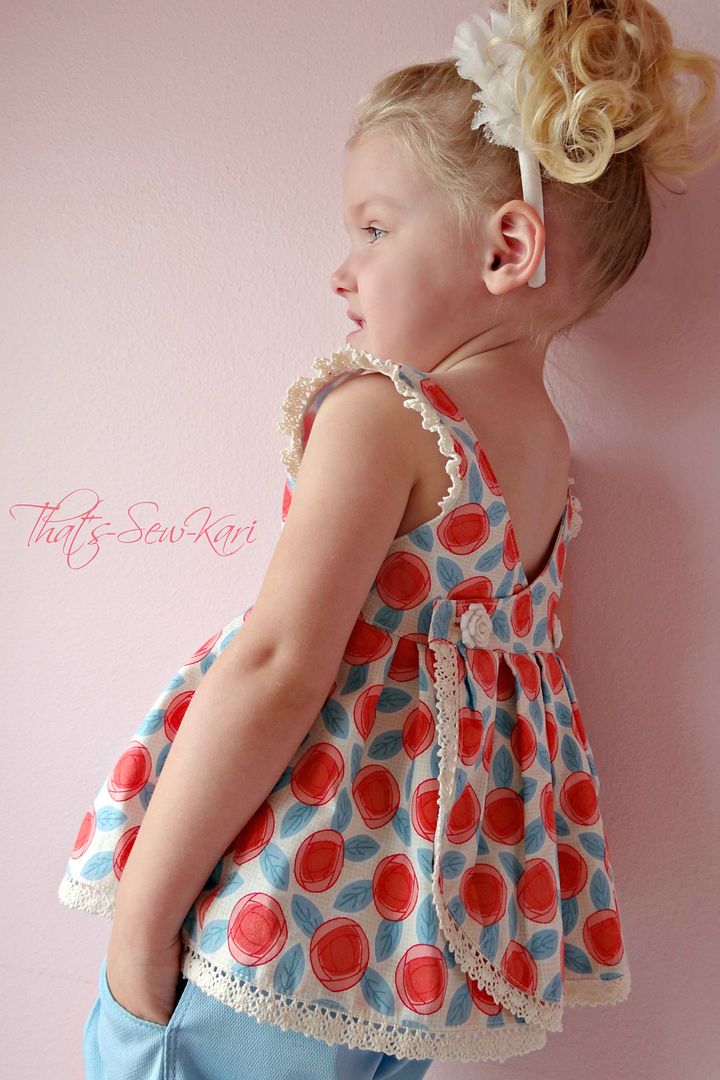
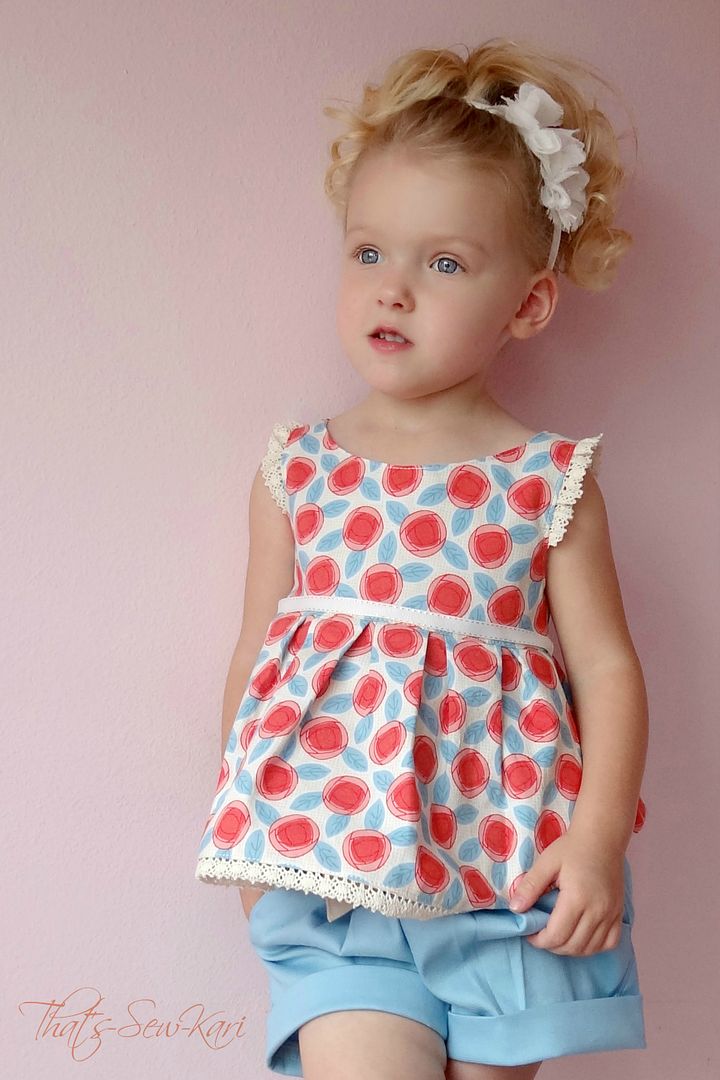
Love the added detail the crochet lace trim gives.

If you've never sewn a pattern from Brownie-Goose, you're in for a real treat.  Amy has a very distinct tutorial style and it will leave you in stitches (see what I did there? hehe).

Let's get to the nitty-gritty of the pattern, shall we?

I added a small grosgrain ribbon across the seamline between the bodice & skirt portion.

Before printing your pattern, I recommend a thorough measurement of your child.  My 3 yr old has a very narrow build and her chest is actually 1.5" smaller than the smallest available (18m).  Now, don't be alarmed, this is something I'm quite used to.  For fitted garments, especially, you don't want to make the mistake of sewing their RTW (ready to wear) size.  Could you imagine if I had just sewn her a 3t simply because that's what she wears in the stores?!  That's the beauty of sizing charts.  I think the fit is great, actually and didn't experience any shoulder slippage.  You can also position the buttons in the back to aid in tailoring the fit just for your child.
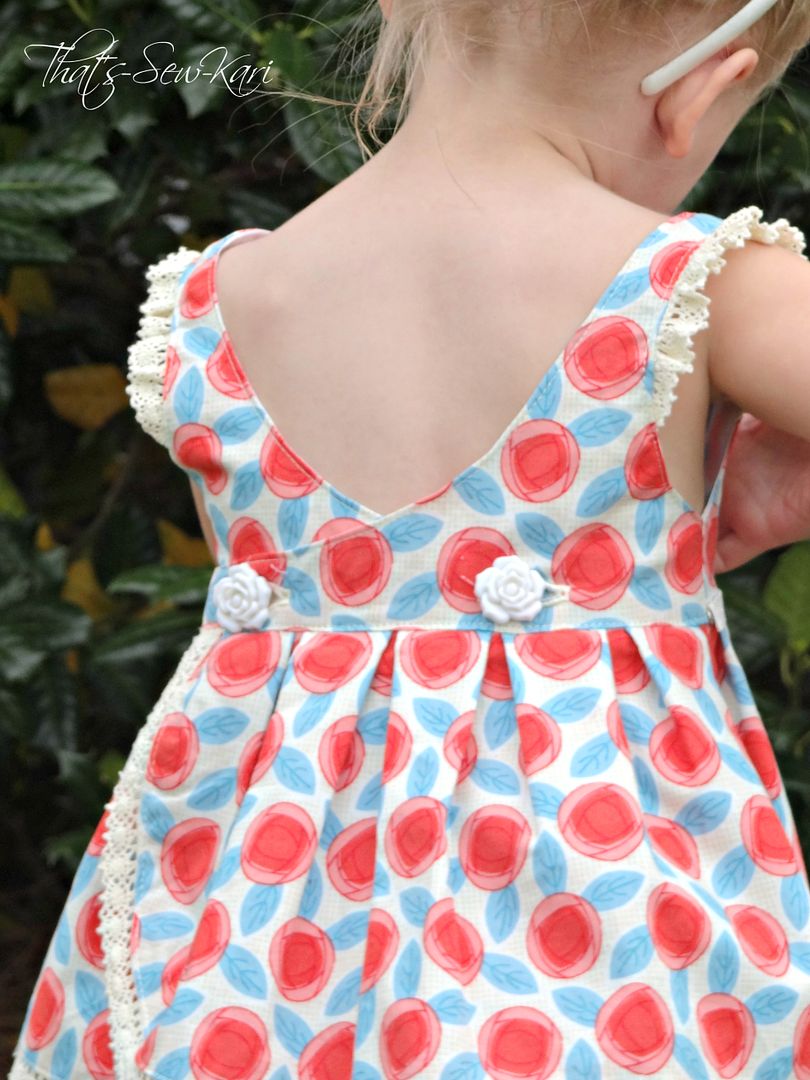
#swoon  -- the back!!

 Printing was quick and easy.  All of the pieces are nested with the exception of the 18m back bodice.  The skirt portions are cut following a cutting chart.  There are 3 different cutting options in the chart for each size so pay attention to which style you are creating.

Shhh.... don't tell my husband she was picking leaves off our Japanese maple.

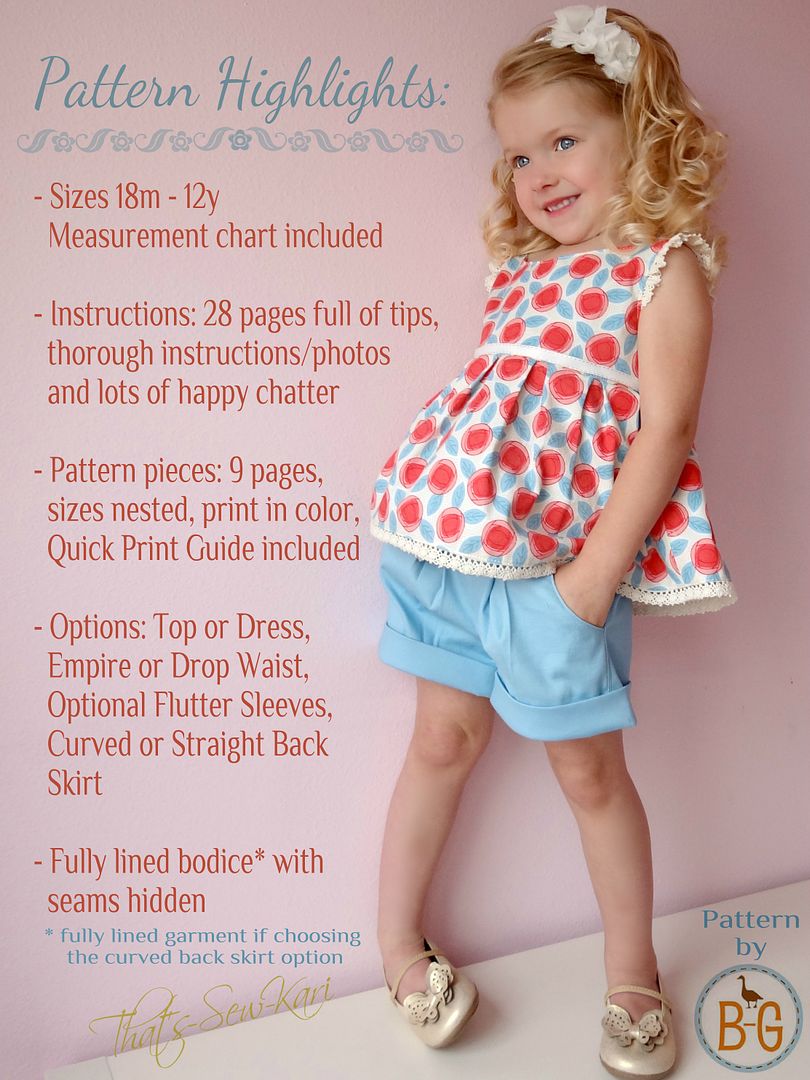
There are so many options included in this pattern that you could make several in a row before repeating.  

Two main options:
Dress
Top

Two bodice options:
Empire
Drop waist (option on dress only)


Two skirt options:
Curved back

Straight back


Two sleeve options:
Sleeveless
Flutter sleeves

Love this top!

So what options did I choose?

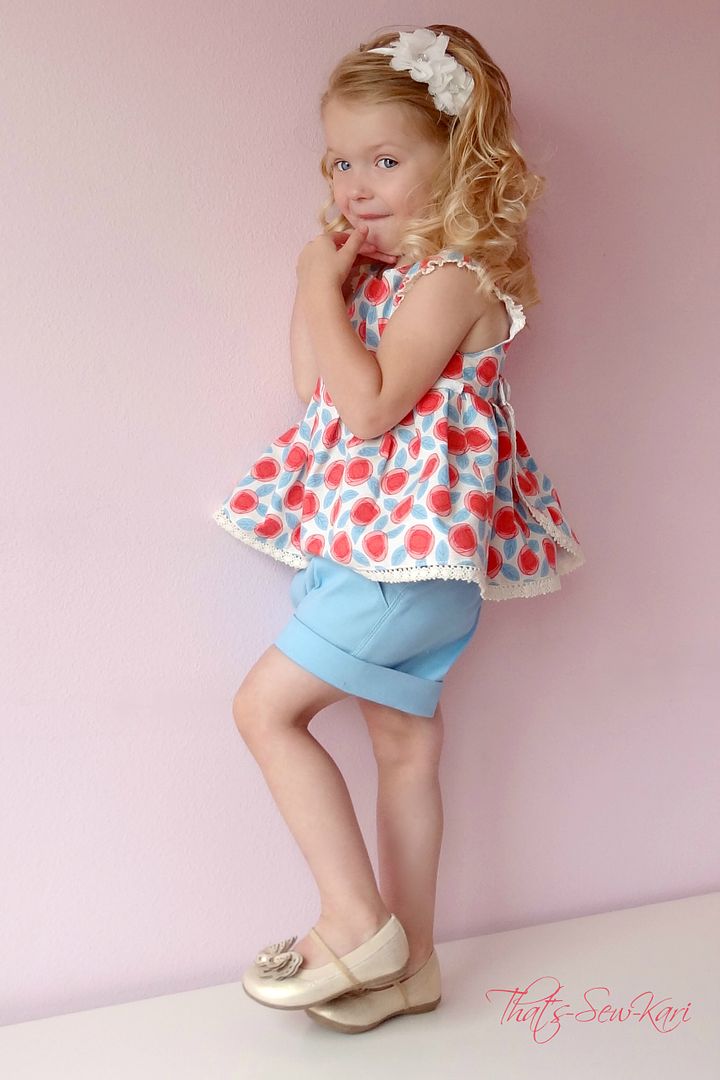
  • Top - I had the perfect coordinating fabric to make shorts 
  • Empire bodice - This is the only bodice option for the top
  • Curved back skirt - I don't think I could ever skip this choice!!
  • Combination of the two choices - I decided to use my crochet lace trim as mini flutters

Couldn't resist using box pleats instead of traditional gathering.

I bet you're wondering if I changed anything!  Well.... of course I couldn't resist making it my own a bit so I opted to box pleat the skirt portion before attaching it to the bodice.  But that's all I changed, I promise.


The shorts are just fab!!

Remember the perfect coordinating fabric I said I had for shorts?  I used the Clover Shorts available at Willow & Co. and I love how the two patterns came together to make a stunning outfit.  Oh, and her cute little gold shoes?? A lucky find at Target!

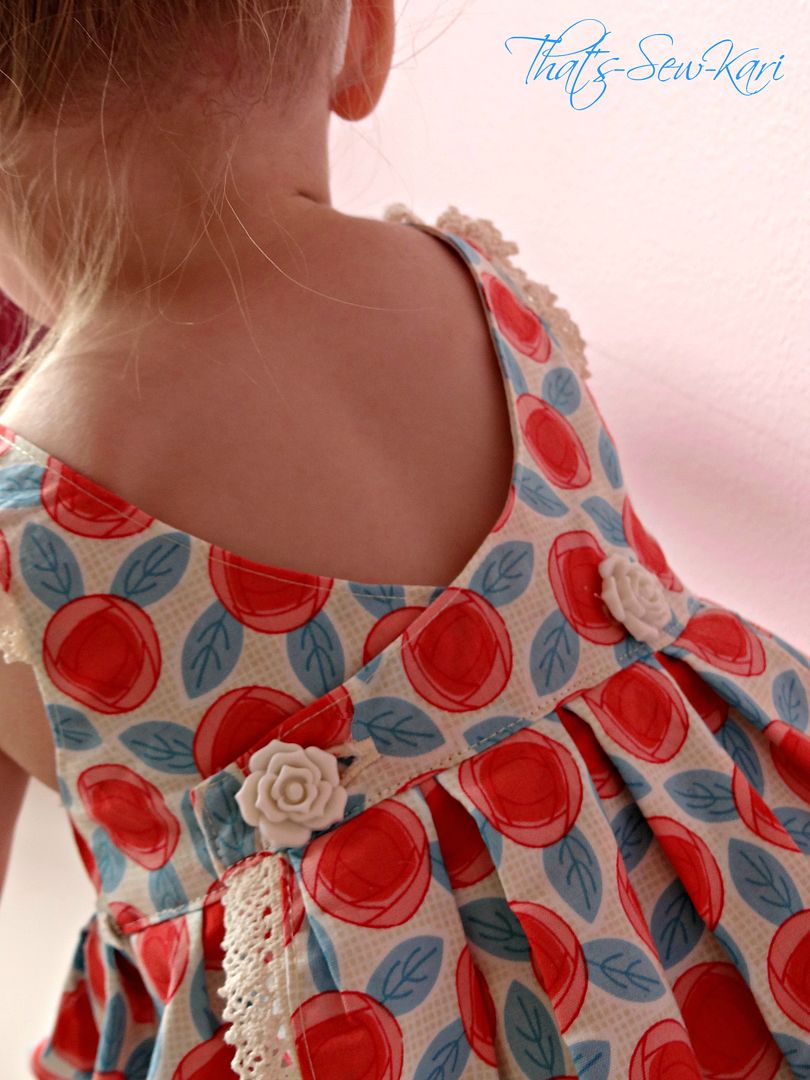
OH. MY. WORD.  the buttons!!!

Get ready to break out your most swoon-worthy buttons and trim -- you won't want leave them off!

This is just one of the patterns available in the Bundle UP collection available at Pattern Revolution starting Saturday, April 26th.  There are 10 other designers and if you can believe it, there are two designers in there that I have yet to sew.  The neat thing about Bundle UP is you can build your own bundle!  Of course, the more you buy, the more you save.  Don't delay, though, because Bundle UP is only available April 26th - May 2nd!


Want a chance to win it before you can buy it?  Click HERE to enter.


And on Saturday, be sure to stop back by my blog and
follow the link below
to purchase your Bundle UP collection!


 photo Untitled_zpse3b223fd.png
Help me earn points and click over from my blog to buy! #affiliate


Making Minnie Mouse - Candy Castle Princess Dress by Candy Castle Patterns


* This tutorial originally aired on Pattern Revolution on October 17th, 2013 *


When I first saw this series idea posted for Pattern Revolution, I knew I needed to sign up.  I knew I'd be using the Candy Castle Princess Dress to create one-of-a-kind Halloween costumes for my girls.  I discovered Candy Castle Patterns at the beginning of the summer with my Bubblegum Dress review.  I was lucky enough to test the Candy Castle Princess Dress pattern and made Sofia the First during testing.  For Minnie Mouse, however, I wanted to deviate from the pattern a little bit so I could share it with all of you!


First of all, this pattern has lots of options so chances are that the pattern contains what you need!  There are 4 sleeve options, a slim or regular fit bodice, hemmed or ruffled underskirt and a paneled or non-paneled skirt.  I've made 3 dresses so far!


Minnie Mouse likes to wear a sweet peter pan collar on her dresses and it wasn't an option in the pattern so I set out to draft my own!  I wanted it to end at the shoulder seam so I would not have to alter the back.


After I rounded my neckline, I drew the collar along the neckline and failed to take a picture... whoops!  Below, is my retraced collar piece.


When you cut out your pieces, cut the interfacing without the added seam allowance to reduce bulk in the seams.


Now, sew according to pattern.

Other than the peter pan collar, Minnie Mouse dresses are easily recognizable simply by choosing the right fabric.  Minnie likes either red or pink, but white polka dots are a must.  My 2 year old was very adamant that she wear the "Pink" Minnie Mouse so I used a combination of pink/large white polka, black/small white polka, and white. (The red combination would be the same combo, but substitute the pink with red and add in some bright yellow!  It really pops!)   All of my fabrics and trim came from Hobby Lobby.

Fortunately for all of you, I couldn't just stop at a simple peter pan collar addition :)  I thought and thought and thought.... and then the light bulb went on!  I decided I wanted a Minnie Mouse head cutout in the back of my daughter's dress for a bit of unexpected awesomeness on the back of her dress.  So, I set out to make this crazy idea happen (because I don't give up easily!).  I practiced on a few muslin bodices first until I got it right.  Here's how I did it (and FREE template HERE!).  In order to fit the template along with the amount of snaps needed, I lengthened the bodice 1 inch from the original pattern.  The space between her ears is the overlap of the back bodice in the original pattern - fate, I tell you!!


You will want to make sure to put 2 snaps both above the cutout and below so that everything lays correctly.

I've made this dress 1 size larger so that I can ensure it fits when her birthday rolls around since it's highly likely she'll want a Minnie Mouse birthday again!  I'm ahead of the game!


To finish the Minnie's look, I chose an eyelet ruffle for my ruffled underskirt to mimic her eyelet-trimmed bloomers and carried the eyelet to the bottom of her sleeve cuffs. I used the large bow template in the pattern to create two bows to place on the front scallops.


My daughter is also wearing the Pettiskirt Party by Foo Foo Threads as well as a shorter 'no-sew' tutu from last year's Halloween costume for maximum poof! I made the Minnie Mouse ears and headband last year since my daughter was also Minnie Mouse then.  I used felt for the ears and stuffed them to make them stand up.  I also stuffed the bow and hot glued them all onto a black headband and then hand-stitched them onto the headband for extra stability.

My 2 year old has been asking for her Minnie Dress for WEEKS!!  Today, she got to go out for a photo shoot and she was in Minnie Mouse heaven.  This girl dreams of Minnie Mouse every night, or so she tells me.  I'm sure she would gladly wear this daily if I let her!


Oh, remember when I mentioned at the beginning how this was the third dress I've made using this pattern?  Here are Sofia the First and Cinderella!


Cinderella was created for a very special customer.  What a lucky little girl!!

Well, that wraps it up!!  Thanks  to Pattern Revolution for having me take part in this series and also thanks to Candy Castle Patterns for a beautiful pattern!  Head over to her pattern shop and show her some love!


Custom Post Signature

Custom Post  Signature