Image Slider

{Cricut Joy}: 3 Simple Projects to Make Anywhere!

This is a sponsored post written by me on behalf of Cricut for Cricut. All opinions are 100% mine.


Everyone needs a little JOY in their life! And Cricut is here to make it happen!!! This machine is small on size, but big on possibilities. It's the perfect machine to quickly and easily personalize anything with one cut and one color, in 15 minutes or less. It makes those little, everyday projects much easier. I already own a Cricut Explore Air 2 and a Cricut Maker, so I was curious if I really needed the Cricut Joy. Yes, yes, I do! And you do too!

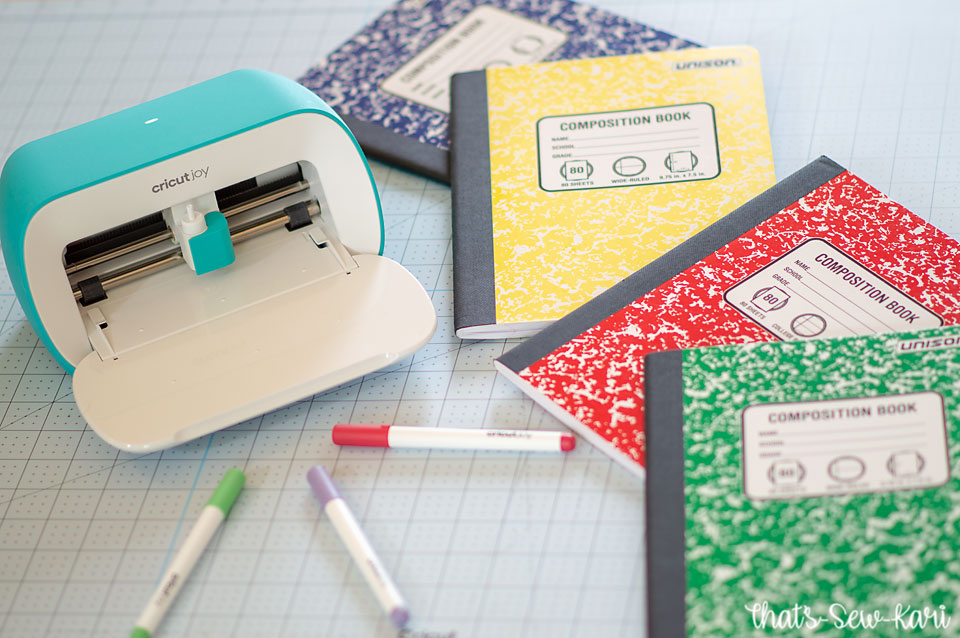
What drew me to the JOY is the portability, the possibility of extra long cuts (yay, mat-free cutting for up to 20 ft repeated cut capability!), and the fact that you can craft anywhere (all you need is an outlet). I'm a preschool teacher and for years, I've wanted to label everything in my classroom, but by the time I got home, I never got around to designing all of the needed cuts. Next week, I return to set up my classroom and cannot wait to tote JOY and do all my creating right in my classroom. It's super tiny (check out the size comparison with a standard composition notebook) and there is an optional tote bag!! It's just so easy to move from place to place without needing a dedicated craft room!

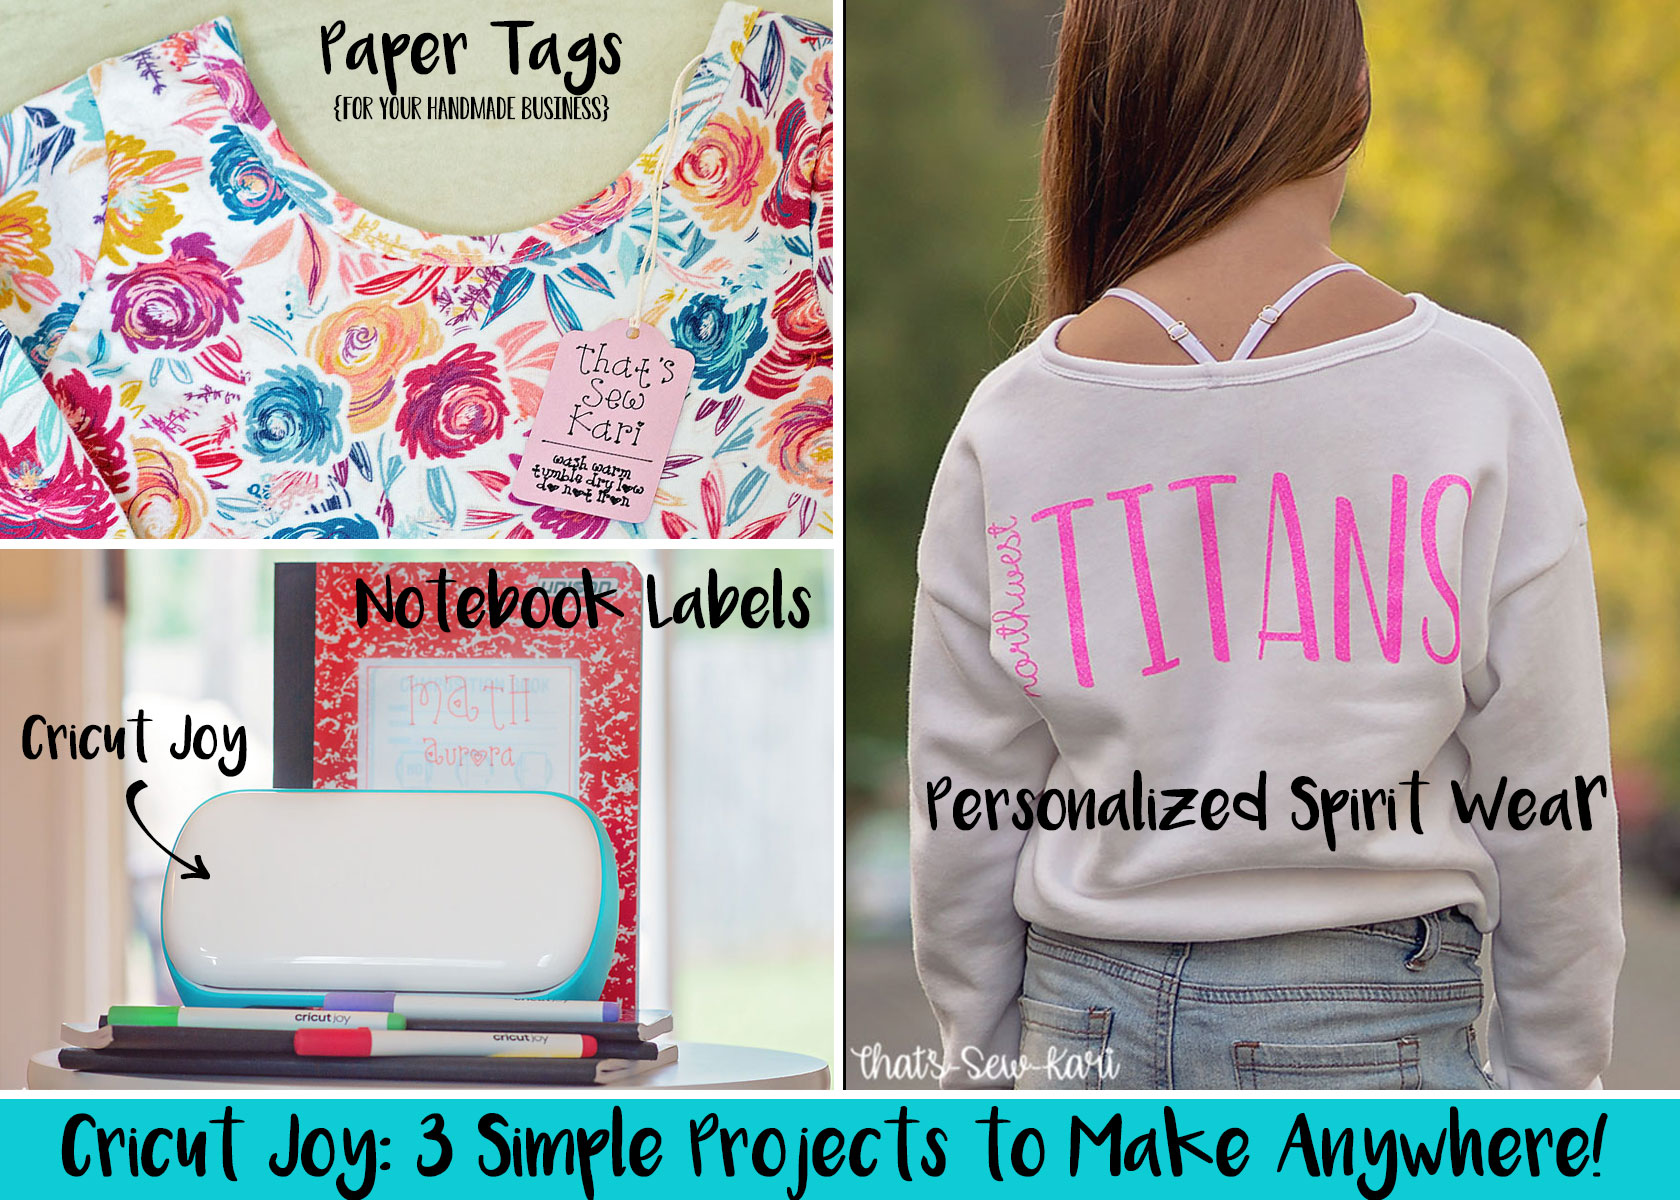
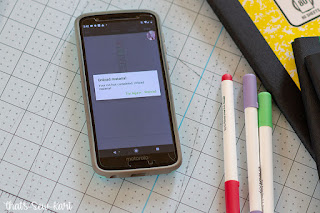
To get myself acquainted on my new machine, I came up with 3 simple projects that I cut in my living room with my phone (yay, for not being tied to my craft space and computer!) and tried out all three cutting materials: Iron-on, Paper, and Vinyl. I used the Writable Vinyl so I could test out the Joy Pens to check for smudging too!!

Project 1: Paper Tags {For Your Handmade Business}

I don't actually sew to sell, but lots of my friends do and sometimes I send out handmade gifts or just want my girls' handmade to feel a little extra special. This project is SUPER easy and takes just minutes.

  • Step 1: Open up Design Space on your computer or phone. Access the editable tag HERE.
    • Choose "Customize".
    • Edit "Your Business Name" and "Care Instructions" and resize as needed.
    • Select all layers and "Attach"
  • Step 2: Click "Make It"
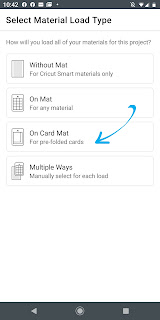
  • Step 3: Choose your "Material Load Type" (I used cardstock from one of the card kits so I chose "Card Mat")

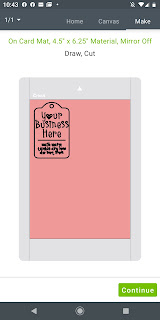
  • Step 4: Check your preview screen -- everything should be on the tag. Click "Continue".

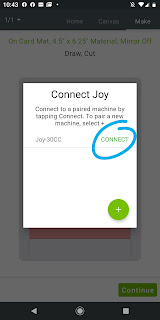
  • Step 5: Connect your Joy by choosing the green "Connect" next to your Joy machine's name.(Make sure your Joy is plugged in and front cover open)

  • Step 6: Choose your Cricut Material.
  • Step 7: Load Material and Tool as instructed on screen and press "GO".
  • Step 8: Change Tool as instructed. Press "GO".
  • Step 9: Choose "Unload" on screen, remove from mat. You're done!

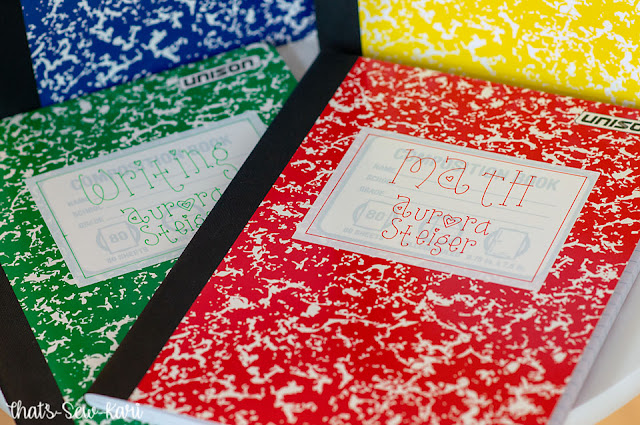
Project 2: Notebook Labels

I always love sending my girls to school with Cricut-labeled notebooks, but occasionally after the notebook is handled on a daily basis, they miss a letter or two. I was intrigued by the Smart Label Writable Vinyl so I gave it a try! It actually turned out SO easy and I didn't need to mess with any transfer tape! Just peel, stick, and go! I also loved that I could have the Cricut Joy write everything out for me and it doesn't smudge. I used the Cricut Joy Fine Point Pens 0.4 which allowed me to color coordinate the ink with my daughter's notebooks. (I'd suggest a solid color notebook, or place a square of permanent vinyl underneath if using over the pre-printed composition notebook label).

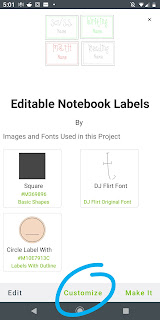
  • Step 1: Open up Design Space on your computer or phone. Access the editable labels HERE
    • Choose "Customize".

    • Edit "Name" and/or "Subjects" and resize as needed. An alternative circle label is a hidden layer. Unhide to use.
    • Select all layers for each label and "Attach". Repeat with the remaining labels.
  • Step 2: Click "Make It"
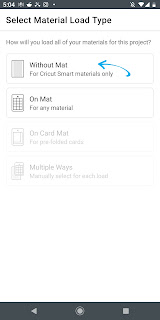
  • Step 3: Choose your "Material Load Type" (I chose "without mat" since I was using the Smart Labels)

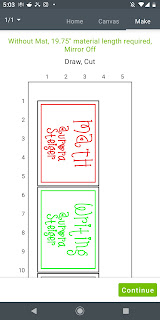
  • Step 4: Check your preview screen -- everything should be on each label. Click "Continue".

  • Step 5: Connect your Joy by choosing the green "Connect" next to your Joy machine's name. (Make sure your Joy is plugged in and front cover open)

  • Step 6: Choose your Cricut Material.
  • Step 7: Load Material and Tool instructed on screen and press "GO".
  • Step 7: Change Tools as instructed. Press "GO".
  • Step 8: Choose "Unload" on screen, peel label and stick on notebook. You're done!
    • Tip: To avoid bubbles on larger layers, apply from one side slowly until it's all applied.


Project 3: Personalized Spirit Wear

  • Step 1: Open up Design Space on your computer or phone. Access the project HERE
    • Choose "Customize".
    • Resize as needed.
  • Step 2: Click "Make It"
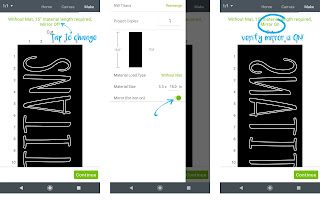
  • Step 3: Choose your "Material Load Type" (I chose without mat since I was using the Smart Iron On)
  • Step 4: Check your preview screen -- Make sure you turn on "Mirror Image". Click "Continue".
  • Step 5: Connect your Joy by choosing the green "Connect" next to your Joy machine's name. (Make sure your Joy is plugged in and front cover open)
  • Step 6: Choose your Cricut Material. (I used the Smart Iron On Glitter)
  • Step 7: Load Material (shiny side down for Iron-on!) and Tool as instructed on screen and press "GO".
  • Step 8: Choose "Unload" on screen, weed iron-on and apply on project using your Easy Press. You're done!
So, just to recap, this little machine has made paper tags (with added writable font), labeled notebooks so they will last all year, and turned a simple sweatshirt into school spirit wear, all projects completed in just minutes!! I've also used the Joy to make extra long cuts in vinyl to make Open House signs for my husband (real estate broker) that would normally been too long for a mat. This little machine is such a useful tool in my craft repertoire and I'm finding myself reaching for it over and over! Head to Cricut.com to learn more. The Cricut Joy is available online at Cricut.com, and online or in store at your favorite craft retailer!

Raspberry Creek Fabrics: Fall 2020 Club Line Release


I'm sure by now, you know my love of fabric runs deep.  I'm always on the search for great quality fabrics that also are in prints my girls love.  I want them to want to reach for 'mama-made'.  I am so excited that I was selected to be on the Raspberry Creek Fabrics Promotions team for the next year!!

Raspberry Creek Fabrics is a fabric company run by a husband and wife team who has offered high-quality apparel fabrics as well as eco-friendly in-house textile printing for the past 10 years.  They carry a "Club Line" which is designed exclusively for RCF as well as other retail fabrics in many different substrates.


I enlisted the help of my girls to help me pick which prints to showcase and which patterns they wanted me to sew them.  Here is our mood board that we created to keep us organized for each fabric (and helped me determine yardage needed).


First up is Stitched Floral -- This floral practically jumped off the screen at me.  I'm a sucker for bold floral prints and this is a perfect Fall floral.  In our pre-design planning, my youngest and I thought it would make a beautiful long sleeve maxi.  However, as I sat down to sew it, I realized she would wear it a lot more often if it had a twirly skirt.  


Modifications:  Modified the skirt to have a ruffled bottom. 

Fabric Base: Cotton Spandex Jersey


Next is the Tonal Mint and White Tie Dye Stripe.  Tie dye is making quite the comeback currently and I love that this one follows trend, but in a more subdued, sophisticated way.   I especially love that I had zero mess making it.  Both girls immediately picked this one, but had very different ideas for how I should sew it up.

Tween:  Her request: a cropped hoodie.  I added in some comfy lounge shorts with the leftovers which made her very happy!!


Modifications: Added thumbhole cuffs from the Bloomsbury Pattern (above) /  No mods on the shorts

Fabric Base: French Terry

Younger daughter: She asked for a tee with ruched sides like I used for her older sister HERE.


Modifications: None

Fabric Base: Cotton Spandex Jersey


Our final selection from the new Fall Club line comes from the 'Be Kind" collection.   Once again, both girls wanted this as well!  They came up with different choices as the coordinate so I actually used the whole collection, minus the floral option.  

Tween:  Her request: another cropped hoodie.  (apparently it's the tween dress code)

Patterns:  Be Creative Hoodie by Ellie and Mac* (affiliate link)

Modifications: Omitted the hood/cowl in lieu of a regular neckband.  Cropped the length and added 3/4" elastic in the shortened bottom band.


Fabric Base: French Terry  (Micro Stripes are cotton spandex Jersey.)

Younger daughter: She wanted a cute dress with a big rainbow on the front.


Modifications: Omitted the sleeve tie, but kept the cutout.


Fabric Base: Cotton Spandex Jersey

{Riley Blake Designs} RBD Basics: Poplin


While I love sewing up gorgeous prints for my two girls, there's something satisfying about choosing a great solid to compliment their personalities and show off details of their chosen dress patterns.  I love looking to Riley Blake Designs for their great 'Basics' selection and was excited to find POPLIN added to the mix.  I've heard really good things about poplin, so I jumped at the chance to try it out!


This is 100% cotton poplin with a thread count of 205.  Poplin has a distinctive ribbed texture and tight weave.

RBD Basics: Poplin comes in a rainbow of colors so I let each girl pick a favorite!  My oldest chose the gorgeous Royal Blue and my youngest picked the prettiest shade of turquoise, Riley Aqua.


As I was awaiting my shipment, I asked some of my sewing friends what poplin was like and they likened it to a men's dress shirt. I remembered that I had Westport by Little Lizard King in my pattern vault so I pulled it back out and really love how this turned out!  


When I had originally sewn the pattern, I made it sleeveless and honestly forgot that the pattern offered flutter sleeves.  Miss 9 is loving flutter sleeves at the moment and is just smitten with her new dress in her favorite color!  

When I was sewing up the collar and collar stand, I grabbed my Riley Blake Tailor's Clapper and Misting Spray Bottle which really aided in getting the crisp lines I needed.


Poplin is a thinner fabric than regular cotton so it's perfect for our hot summer heat!


My oldest daughter is entering middle school this year and has been dreaming of this dress for two years now.  It was fun to finally make it a reality for her!  We used Colmar from Little Lizard King and left off all the ruffles.  I shortened the skirt just a smidge to match the vision in her head.


The circle skirt shows off the drape of the poplin beautifully.


For added interest, I added a tie across the back opening.  We love that this dress has no buttons for her hair to get snagged on and is just pull on and go!  


I really love this picture!  They are the best of friends (most of the time...lol) and seeing this just melts my heart.  I also adore these two colors together -- they really pop against the background.

My first (two) poplin projects definitely didn't disappoint!!  The fabric is lightweight, sews (and irons!) easily and both girls thought their dresses were very comfortable to wear.  I have just a bit leftover so I'm going to see how this fabric does in the new Little Lizard King Halsey shorts!
 

I hope I've inspired you to sew up your own project in poplin -- what would you sew first?  

Visit your favorite quilt shop to pick your favorite shades!  

Custom Post Signature

Custom Post  Signature