Image Slider

{Project Run & Play} Week 3: Fairy Tale


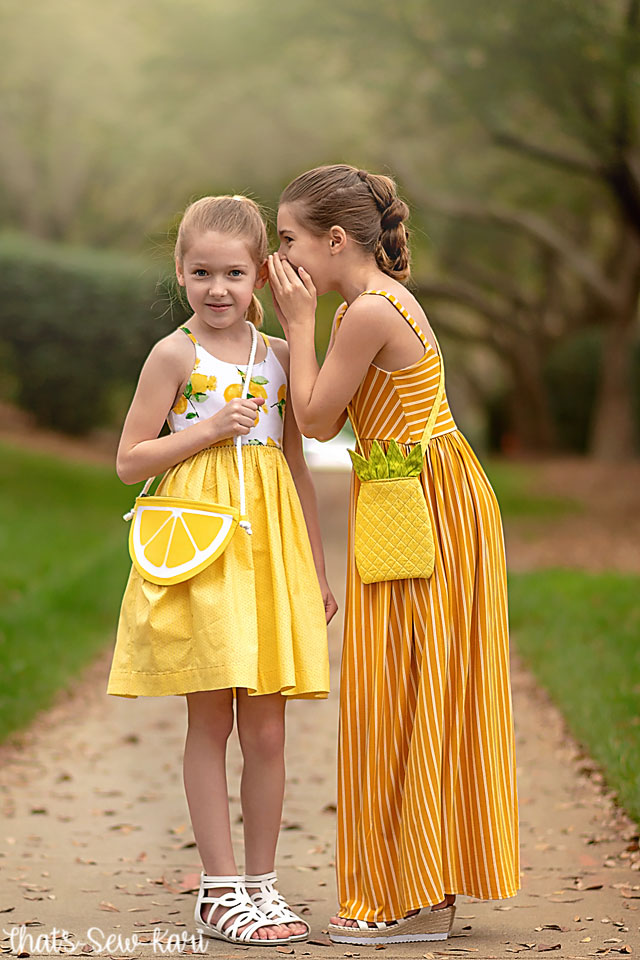
Hello and welcome to Week 3 of Project Run and Play: Fairy Tale Week!!  This theme was my most anticipated and hopefully I don't disappoint!!  All sorts of ideas ran through my head immediately.  First, my youngest daughter shares a name with a princess - Aurora  - although, she's actually named after the Northern Lights.  I knew I couldn't leave out my oldest so I thought she'd really love Belle and as soon as I told her the theme, she immediately shouted Belle!!  Next, I needed to come up with a plan and I really wanted to make sure it wouldn't come across as costume-y and would be pieces they would absolutely wear to school -- when they get to go back of course!   So much has changed in the few short weeks of receiving the theme to actually executing it and although I couldn't shoot at my intended location, I've learned that I can adapt pretty easily and can surprise myself creatively.  


Of course, what tween-aged princesses in the present day wouldn't be on social media?  So after our photo sesh, I peeked at their social media and was pleasantly surprised that they had shared SO many pictures. 😉  

Princess Aurora


 As I started planning my sews, I knew I wanted to play off the famous scene where Merryweather and Flora had uh, differing opinions on how to dress Aurora.   I selected a super soft, lightweight pink knit for her shirt and decided to make a trendy high-low peplum that would end just above the waistband in the front.  I grabbed my most used knit bodice (and always out), Wimberley from Little Lizard King.  To make the high-low peplum, I turned to the Thistle Dress by Jennuine Design (for One Thimble Issue 23) and used the skirt overlay piece.  As a nod to the white accent on Aurora's iconic dress, I drafted bow sleeves with peek-a-boo shoulders and carefully enclosed them in the bodice armscye by completing half of each burrito roll at a time. At the request of my own Sleeping Beauty, I grabbed my white iron-on and found "Nap Queen" on Cricut.  It's quite ironic though because she does not nap, not even on 12 hour car rides.  And she stalls literally every night at bed for at least an hour. 🤣


 Next came the jeans.  I originally had other plans but couldn't source the material I wanted so I got creative.  In my pre-season shopping spree from Cali Fabrics, I had grabbed 2 yards of Indigo Washed Designer Stretch Denim and was glad I did.  I turned that fabric inside out and boom, light blue jeans. HA!  I had recently tried the Tyler Skinnies from Petite Stitchery & Co and it was love.  For this project, I removed several inches for a nice cropped length and to add a little cool factor, I frayed the ends a bit.  To finish, I grabbed a light pink jeweled shank button that I bought who knows how long ago for the faux button waist and some light pink and white iridescent beads that were gifted to me nearly four years ago and hand beaded them on to bling out the pocket detailing.
  

Finally I drafted a cell phone purse to showcase the Pink Dot on White Oil Cloth from Cali Fabrics that I had also selected a few weeks ago.  I had found these over-sized grommets one day when they "fell" into my hand at Hobby Lobby that I was dying to try out.  The bronzed gold coloring on them matched the zipper pulls from the 40 lace zippers I ordered from Amazon a few weeks ago.  I started by encasing the lace zipper and in order to not wrinkle the oil cloth by turning it right side out through the 8" zipper opening, I finger pressed the seam allowance on each side and used clips to hold them in place while I top-stitched.  And yes, I held my breath because you know there cannot be any seam ripping on oil cloth!  Aurora wanted a single shoulder strap, but was very adamant that she didn't want it long enough to be cross-body length.


Aurora absolutely loved every piece.  She even told me the shirt was so soft, she was going to wear it to sleep.  Guess I'll sew up some matching sleep shorts...lol

Princess Belle

For Belle, I knew I wanted to convey a preppy vibe.   I found some yellow floral eyelet that has sat on my fabric shelves for the past 7 years.  I know I bought it on my first JoAnn's trip here and nothing has quite seemed like the right project until now.  In order to replicate the skirt that was in my mind, I decided to draft it on my own, using Marissa's measurements.  I knew I wanted a fitted waist with a side zipper.  Because my main fabric was eyelet with rather large holes, I needed it to be lined.  I didn't want to just baste the top layer onto the lining so I created the lining into a built-in pettiskirt.  It turned out exactly like the skirt I had pictured.


I had an image of the type of top I wanted in my head and after sewing it up, I realized it was just a bit too casual for the rest of her pieces.  I looked through my stash because I can't go buy fabric at the moment and I realized I had a piece of leftover linen from a Riley Blake blog post.  It was a lightbulb moment and I knew exactly the perfect pattern.  I quickly printed out the Give Piece a Chance Crop Top by Duchess & Hare from Issue 15 of One Thimble.  I used just the lining pieces and added some length so it would hit right at her belly button and just above the waist of the skirt.  Then I cut out a large foil iron-on rose outline in Cricut as a nod to the rose the Beast kept in his glass case..
I love the button back of the crop top and it was the perfect place to add a pop of red.  Belle liked it too!!

I knew from the very beginning that I wanted to create a denim jacket for Marissa.  I picked out Indigo Washed Designer Stretch Denim from Cali Fabrics and honestly didn't decide a pattern until a few days ago.  I decided Clementine from Violette Field Threads was a great base silhouette to get me started.  One of the details I kept was the princess seamed front.  I cropped the hem of the jacket by a few inches, added a bottom band, pleated the sleeve caps and removed the front overlap.  I also pieced the back of the jacket into 4 pieces to mimic a jean jacket my daughter owns.  It's fully lined in an indigo vertical striped fabric from my stash.  Every seam is double top-stitched in a gold thread.

It's all in the details.   I had to add closeups of  all the little details on Marissa's items.  I am super proud of the fit of the skirt and the neatness of the enclosed zipper.  I added a hook and eye at the inside top to make it easier to zip herself and also to ensure the she doesn't have any wardrobe malfunctions should the zipper get a little lazy.  Another favorite detail is the facing on the lining of the jacket.  I think it gives a polished look and looks great next to the stripes.   I think the was Marissa's favorite week.  She absolutely didn't want to stop taking pictures!  

If you have already voted, please go vote!!! Next week is the FINAL week and I'd love to make it there!!  CLICK HERE TO VOTE


Singing in the Rain by Flamingo Toes for Riley Blake Designs


Happy Spring y'all!!  I don't know about you, but I could use a little something to brighten my days and this collection - Singing in the Rain by Beverly McCullough of Flamingo Toes for Riley Blake Designs - is definitely bringing a smile to my face.  It's full of bright, cheery colors and has cute rain boots, umbrellas, flower and bias stripes!  


I knew I'd choose the stripes because y'all know stripes are my absolute favorite!  I chose Singing in the Rain Ribbons in Raspberry, and paired it with Singing in the Rain Umbrellas in Waterfall and accented with Singing in the Rain Drops in Raspberry.  I love how the Raspberry prints bring out the darker umbrellas.


I don't normally repeat pattern selections back to back, but I turned to my new favorite pattern, Carmelo by Little Lizard King.  I couldn't help but piece the front bodice together for added interest.  It's my favorite thing to do with stripes.  Because the stripes were on the bias, one side is cut on the grain-line and the other is turned 90-degrees so it would match across the seam.   I also modified the neckline to a normal rounded neckline.


I really wanted to try out the simple back which doesn't have scallops but I used the Ribbons as my lining so I could roll it to slightly show on the outside as faux bias tape.  I also turned the stripes at a 45-degree angle for the bottom back bodice pieces.  I lined it with fabric cut on the grain-line so they wouldn't stretch when worn.


She REALLY wanted that twirly skirt again so of course, I couldn't say no!  The bottom piece is 3 pieces (width of fabric) pieced together.  She twirled so much she made herself dizzy and had to sit for a second. HA! 


My girls always get really excited when I get a package from Riley Blake Designs.  I love it too because the designs are always so cute, colors are vibrant and the fabric is soft!  These dresses get worn over and over again which means a lot of washing and they always come out looking as good as the day I sewed them!!  I can't wait to see this dress thrown into the mix!

{Project Run & Play} Week 2: Transformation


Hip hip hooray!!  We've made it to Week Two of Project Run & Play and before I give you all the details of this week, I just want to share a heartfelt thank you from both my girls and me!  We pour every ounce of creativity into our creations and photos and your support means the world to us!  Now on to this week!


Week 2: Transformation
From one season to the next, from day to night, from garment to accessory…  This week you’re going to show off how your look can act like a chameleon and change to fit the occasion.


The moment I was given this prompt, my wheels have been turning as I found this one to be the most challenging of the 4 weeks.  Finally, inspiration struck and I decided to celebrate my oldest daughter as she leaves elementary school and enters middle school in the Fall.  She has really become quite the fashionista lately so I came up with a 4-piece REVERSIBLE quick capsule that she can mix and match to her heart's content.  I picked out her favorite colors and set to work.

Piece 1:  Reversible Dress/Skirt

The main piece of the collection is a combination skirt/dress that is self-drafted (except for the pockets).  I chose a lightweight hot pink solid, black ponte knit and a funky-patterned lightweight woven.  It can be worn as a strapless tube-style dress or the top can flip down into a yoga waistband to become a skirt.  For the pink skirt, I also added the pockets from Little Lizard King's Carmelo Dress. 


Piece 2: Reversible Ruffle

Next, I drafted an optional reversible ruffle using both skirt fabrics.  Because both fabrics share the color hot pink, you can wear either side with either skirt/dress.   There is hidden elastic between the top layers.  I added a halter tie at the request of my daughter which also doubles as a decorative bow when the ruffle is worn on one shoulder.  The ruffle is also long enough to be worn as a crop top halter with the skirt option.  The ruffle can be worn off the shoulder too (as opposed to under arm), but we forgot to take those pictures... whoops!  Halter is her favorite way to wear it!


Piece 3: Reversible Tank Top

I knew my daughter would want the option of wearing something more casual some days so I grabbed a super sweet pink with hot pink polka dots cotton lycra and some black mystery knit and made a tank top.  I started with the bodice of the Wimberley Dress by Little Lizard King and lengthened it to tank top length.  I really love the scooped back of this pattern and by using the burrito method, it's easy to make it sleeveless.  I hemmed each side independently to reduce bulk at the hem and she can easily tuck the inner side into the skirt if she wishes.


Piece 4: Reversible Mini Backpack/Cross-body Purse

When I was browsing Cali Fabrics for my pre-season shopping spree, I came across their selection of Oil Cloth and I fell in love with the Black Polka Dots on White and had to have it!!  My oldest loves purses and mini back packs and I had a feeling oil cloth would be perfect.  I turned to the Animazing Backpack Add-on by Little Lizard King and sewed up the mini size but modified the straps to transition from backpack to cross-body or shoulder purse.  I also made it a reversible cross-body or shoulder purse in a solid black.  I haven't used oil cloth before and I was pleasantly surprised at how easy it was to work with.  I didn't even need my Teflon foot!  I couldn't iron after each step like I normally do, but it finger-pressed really well!  You cannot rip any stitches though so you have to be precise the first time or you'll have holes.


There you have it!!!  She's in love and promptly stole it away to add to her closet.  If you haven't had a chance to vote yet..... CLICK HERE to vote (Remember, select your two favorite!)

Fabric Details:
  • Patterned Fabric: Lightweight woven from Hobby Lobby (I think.  It's possible it was a mystery bolt from Walmart).  
  • Hot Pink Fabric: Hobby Lobby Sale Bin last year.  If I recall, it may have been a rayon blend of some sort.  It definitely has a very nice drape.
  • Black Bodice/Skirt waistband: Black Ponte Knit from Hobby Lobby.  
  • Black Tank: Lightweight Black Knit (possible ITY) from Walmarts Pre-cut Mystery packs.  It is so soft and definitely more challenging to work with than cotton Lycra
  • Pink Polka Dot Tank: Stenzo knit from Mabel Madison.  
  • Black Purse - Mystery fabric from CVAN (thrift store in town that aids battered women)
  • Black Polka Dotted Backpack - Oil Cloth from Cali Fabrics

{Riley Blake Designs} Noah's Ark by Shawn Wallace


"The rainbow reminds you... I will keep this promise forever"  - Genesis 9:13

Happy St. Patrick's Day and welcome to "Two-fer Tuesday"... If you're an early riser, you may have seen my other post which is my entry in Week 1 for Project Run and Play!!  I'm so glad I have sewing to give a creative outlet right now as the world has turned on its side in literally the last few days.  I'm praying for a rainbow at the end of all this. This collection came at the perfect time and is a gentle reminder that everything will be okay.

When I first saw the Noah's Ark Collection by Shawn Wallace for Riley Blake Designs, I thought it was so super cute and would look so perfect in my preschool classroom (our school logo is Noah's Ark).  Of course, I specialize in clothing for my girls so my 9 year old helped me select a couple prints for a "twirly" dress for herself (because is a dress even worth making if it's not twirly?)  The collection comes in a navy, light blue or white background and features Noah's ark, his animals, rainbows and raindrops.   There is also a panel on 3 colorways, along with a couple prints on green and one on red which is perfect for mixing and matching.


I had a feeling my daughter would choose the rainbow print and she did!  She chose Noah's Ark Promise in Blue and selected Noah's Ark Raindrops in White as an accent.


When I ordered the fabrics, my daughter and I had another pattern in mind, but last week, the most perfect dress pattern released and I loved sewing it so much the first time around that I couldn't help but sew up another.  This is Carmelo by Little Lizard King!  I was glad I ordered enough of my main print that I could make the skirt as twirly as it could get and sew up the tiered skirt.


I tried out the pockets too!  She loved that they were so big.  I love that they are scooped out of the front piece because sometimes my girls have a hard time finding them on the side seams.

I love the weight of Riley Blake Woven.  It's the perfect mixture of softness and nice weight to it.  It always washes nicely and irons up well too!


This back gets me every time.  I chose the scalloped back because it reminded me of the clouds.  I added a pop of green with the lace zipper (I have 20 colors so it was hard to choose...thanks Amazon - HA!) I used the Raindrops in White for the back bodice side panels as well as the lining.


She, of course, loves the twirl so it was worth all the hand gathering to make it happen!!  What's is your go-to method for gathers?


Thank you Riley Blake Designs and Shawn Wallace -- this fabric is adorable and is the perfect reminder that we shall weather the storm.  Hopefully there's a pot of gold at the end of the rainbow!! We will all need it!


{Project Run & Play} Week 1: Analogous Colors


Yay!! It's finally the day to share Week 1 of Project Run and Play!  This opportunity is literally a dream come true and when I received the message to be one of the designers, I was speechless. 

Week 1: Analogous Colors
There’s no denying it’s THE hot color scheme in the fashion world right now!  Grab a color wheel, choose your analogous colors, and be inspired to create your own look.


Psst.... want to hear the backstory of Week 1? 

I originally purchased an entirely different set of analogous colors (which I'm keeping a secret...lol) and had my ideas sketched and prototypes sewn.  I liked them, but wasn't in love so I was trying to figure out what to do.  Then I happened upon the inspiration while walking through Walmart and found the two-tone skirt fabric my youngest is wearing. It reminded me of lemons.  Of course, I tried to put it out of my mind because I had literally just purchased yards upon yards of fabric for this other color scheme.  Well, I've always listened to gut instinct and  I caved two days later and bought the yellow fabric that stopped me in my tracks; thus completely switching my plan.  Then I turned to my stash that's literally taking over my room and was quite pleased to find so many different fabrics that fit as well.  As I sew, I tend to modify my projects as new inspiration leads me down another path.  This project was no exception and I've learned to just embrace the journey.

Analogous colors selected: Yellow-Orange | Yellow | Yellow-Green

Inspiration: Lemons and Pineapples -- refreshing summer fruits


First up is Miss Lemon!  Not only does my daughter enjoy sucking on lemons, her personality has a bit of lemon zest added... a bit sour at times but mostly refreshing when sugar is added.  Don't forget the sugar!!

I began to create a sundress that would make sense to showcase multiple fabrics, had a back cut out, used one of the 40 lace zippers Amazon shipped me and had fun pockets!  Pockets are always a must.  


I started with Carmelo by Little Lizard King as my base pattern.  It was the fitted bodice I was looking for and what hooked me on lace zippers.  The front bodice, I simply removed the princess neckline and opted for a simple rounded one. For the back,  I started with the simple overlay and redrew it to be much narrower and then added a cutout in the back that mimics the end of a lemon. I also changed it to stop at the top seam of  the back bodice band, enclosing it inside.  Above the cutout are two buttons and below is a lace zipper. 


For the pockets, I wanted a panel that would fold up into pocket but would not need any visible stitching other than where the elastic is. I taped some paper together and got out my ruler and was pleased when I folded it all up that it looked just like I wanted.  I didn't want the pocket to just gape open at the top, so I made a 3" channel for elastic to "pucker" the top up, just like when you eat a lemon.  I placed the pocket panels so they straddled the side seams so the pockets would be in a comfortable and useful place.  For the hem of the dress, I made it a deep 1.5" and chose a blind hem stitch.  This way, it helps hold the shape of the skirt with the added pockets and gives a little growing room in height.


If I'm being honest, this self-drafted lemon purse is my MOST favorite piece of the collection. I liked it so much, I sewed it twice....lol  Well, I should say, I re-sewed it.  I finished the first one and realized that I really wished I had put a zipper on it and I happened to have one that was a perfect fit.  So after I tried to partially unpick stitches to enclose the zipper, I decided I'd rather just completely start over... so I recut like a couple hours before photos. HA!  The white is iron-on with my Cricut.  The slice was originally a whole circle slice image, but I worked a little Cricut magic and it was just the touch I needed.  I used a wide cord for the strap.


Fabric Details:

  • Lemon Fabric:  Hobby Lobby purchase last year, hiding patiently waiting in my stash.
  • Green/White Stripes: Scraps from my Riley Blake Designs Stripes blog post
  • Yellow Circle on Yellow: Walmart
  • Yellow (Lemon Purse): Waverly by Walmart  
I'm a bargain shopper!


Next is Miss Pineapple!  At nearly 11 years old, but just barely over 4 ft tall, she stands tall with an invisible crown of confidence and is super sweet. 

I knew I wanted to create a summer maxi for her because they do help you look taller and when I found the Yellow-Orange with White Pin Stripe, I knew the stripes would enhance the illusion of height.


Of course, when I see stripes, I can't help but piece the front bodice together!  Not only do I love the challenge of matching the stripes, but it also mimics the diagonal lines of a pineapple (PSA: don't try to weave knit y'all, that was my first plan and time waster of two nights...) I started with Capri by Little Lizard King as my base bodice.  I removed the tie and rounded the neckline.  For the straps, in order to handle the weight of the fabric of a maxi, I added elastic inside of them and sewed them as I would sew swim straps, with the elastic attached and the seams and stitching hidden.  I also arched the waistline, drawing inspiration from Magnolia by Little Lizard King.


On the back, I scooped it out between the straps and then I redrew the strap placements to come up to meet the strap, like like the front (the original back is straight across with the straps enclosed in the seam).  For the skirt, I used the width of the fabric and added pockets at both side seams.  I used a narrow hem to finish it off.


For the final piece of the collection, I drafted a Pineapple Cross Body Cell Phone Holder,  Before I began, I quilted the fusible fleece interfacing onto the main fabric. The holder is fully lined and has a leaf crown at the top in front.  This way, she can easily access her cell phone without foraging through leaves (see back view below).  I attached the straps in a way that will not get twisted as she wears it.  They can also be knotted in order to be carried by hand.


Fabric Details:

Never throw a scrap away!!! You may need it someday!


I titled this collection "Simply Sweet" because as I was looking through my pictures, I came across a picture where my girls were just walking together, deep in conversation and my youngest just impulsively leaned over and kissed her big sister on the shoulder.  It was just the sweetest little moment to witness and thus my collection was named.  I hope you loved this as much as my girls did!! 

I want to stick around for a bit and show you more! 🧡💛💚


"Will you be my best sister?!"

On our way back to the car, we found a gazebo and they ran ahead to step inside.  When I got there, this is what I saw.... awww!!!  My girls are so precious sometimes!  I honestly NEVER know what they will do next.  


Custom Post Signature

Custom Post  Signature