Image Slider

Showing posts with label Embroidery. Show all posts

{Riley Blake Designs} Flower Garden by Echo Park Paper Co.

It's hard to believe we're already in April and Easter is just around the corner.  Every year,  I love to make a special outfit for church.  I've sewn several new dresses over the past couple months that "were in the running" for Easter morning, until I received this fabric in the mail.  All I had to do was figure out a dress that encapsulated the beauty of the fabric.


Flower Garden by Echo Park Paper Co for Riley Blake Designs is a gorgeous fabric collection of stunning floral prints with traditional gingham and dot coordinates.  The color palette is perfect for Spring!  


I absolutely adore floral prints so one of the main floral prints was a must.  I chose the cream colorway.  I couldn't pass up the coral plaid/gingham and then added the blue dots for a pop of contrast.    
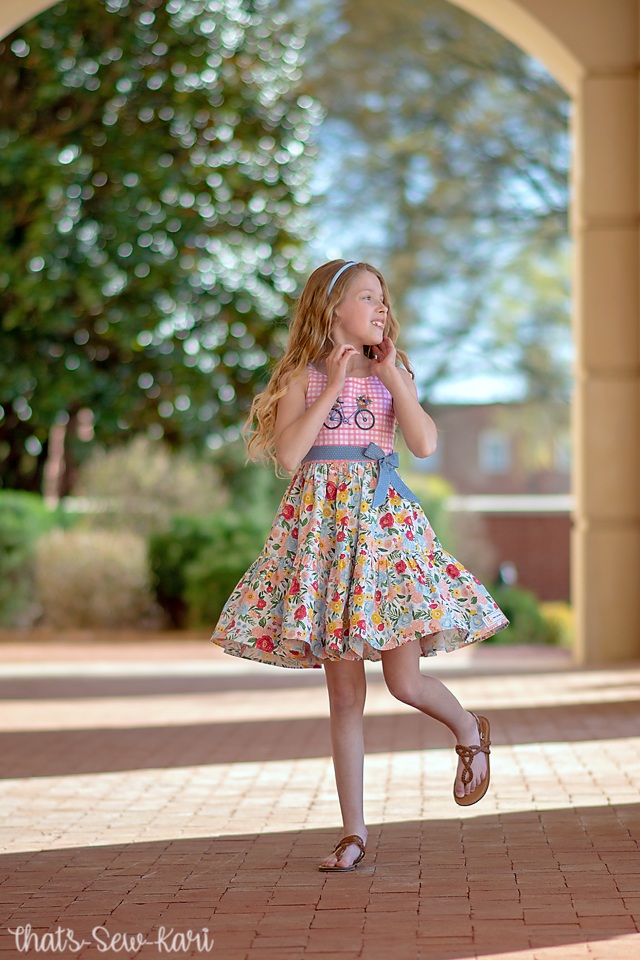

Every once in a while, I let the fabric speak to me... I'm never disappointed in what it tells me.  The dress is two patterns mashed together because I really loved the top of one and the bottom of another.  Grabbing a skirt from another pattern is super easy since they are gathered.  Just make sure to double check the skirt length you need in case the bodice is taller/shorter on the second pattern.    Here I've used the Freesia bodice and belt and the tiered skirt from Poppy, both from Peony Patterns.


I added the Tulip hand-embroidery also from Peony Patterns on the bodice and I am so in love!!  One of the options was a bicycle full of fresh cut flowers that was perfect to compliment the fabric.  My daughter, however, was slightly disappointed there wasn't also a bunny riding the bicycle... HA!  She still loves it though and saw the many hours I put into it.  


Riley Blake Designs' fabric is always a dream to work with!  I know I can always line up my prints because it's always on grain.  The colors are vibrant and never run.  It's so good!


The reason I almost always choose a tiered skirt.  The dress must twirl!!  I love the fullness the bottom tier gives to the silhouette of the dress.  Freesia comes with a great double circle skirt for maximum twirl, but I need extra wide fabric to be able to fit her size for the skirts.  For now, she's happy with this solution!


I recently got labels with my blog logo on it made to add to her dresses.  She loves showing her friends and makes her feel like she's got a boutique dress.  These labels are from Jennifer's Jewels Labels and it was super easy to order.


Flower Garden has just been released!  Be sure to check with your favorite quilt shop to purchase your yardage.  Make room on your shelf because you'll want it all!!


{Riley Blake Designs} Honey Bee by My Mind's Eye


Bees and I have never gotten along -- just ask my mom how many plates I broke outside growing up because I thought a bee was near me.  HA!  But bees on fabric are super cute and more my speed.  Bees always make me think of summer so I knew a summer dress was in order.  

Honey Bee by My Mind's Eye for Riley Blake Designs is a stunning palette of black, parchment, daisy and taupe.  The main prints and the coordinates of wildflowers, plaid, honeycomb, and more all mix and match making the possibilities endless. 

Normally when I select fabrics for a new fabric collection, I choose a main print and maybe a coordinate.  This time, I loved so many together that I chose FOUR prints!  I chose Honey Bee Floral Parchment, Honey Bee Honeycomb Daisy, Honey Bee Honeycomb Parchment and Honey Bee Plaid Black.


I knew immediately I'd be adding hand embroidery to the bodice, but first I had to decide the perfect dress.  I almost sewed up a new Siena, but then was reminded recently how much I love Amsterdam by Little Lizard King. Luckily, I could easily switch gears and I'm so glad I did!


I added one of the designs included in the Madeira Hand Embroidery by Little Lizard King.  I love that embroidery allows you to customize the colors to perfectly compliment your fabrics.  Instead of using white for the daisies (which would not have shown up on my fabric), I chose to turn them into Black-eyed Susan flowers.

I added a colorblocking element to the bodice so I could keep my original plan of fabric placement.  To do this easily (without piecing it all together and risk forgetting additional seam allowance), I cut out the bodice from the embroidered panel.  Then I folded under the sides at a slight angle -- I just eyeballed this step.  Once I had it how I liked it, I pressed the edges in place.  Next, I took small strips of the plaid (folded in half) and slipped it under the edge.  Finally I overlaid it a bodice cut in the daisy colorway and topstitched my overlay on top.  To reduce bulk before lining it, I carefully cut away the extra fabric underneath the overlay.


I love the unique back on this dress.  Plus, it is elastic so even if she hits her growth spurt this summer like her older sister did, she can still fit this!  

I also added a ruffle to the bottom of the skirt.  My ruffle is 1/3 the height of the main skirt (roughly).  If you decide to add a ruffle, remember to add in the seam allowance needed to attach it to the skirt.  I cut double the width of my skirt which gives a nice amount of gathering.


My daughter always appreciates when I add hand embroidery.  She sees me working on it and knows it adds time to my creating process.  

I topped off her look with a Nara Bow which is seriously my go-to bow.  I'm pretty sure she has over 20!  It sews up in under 5 minutes and then you hand tie it and slip in a clip.  Of course, I always sew it up last minute too!


Be sure to check with your favorite fabric shop
to get your yardage of Honey Bee!! 

We love it!

{Peony Patterns) Now in Doll Size


 I'm no stranger to sewing doll clothing, but it's been a hot little minute since I've taken the time to sew some up.  When I saw Peony Patterns was expanding to doll sizes, I had to try some out!  My girls love their Peony Patterns dresses and I couldn't wait to see them sewn up in miniature.   Once I started, I couldn't stop.  In the end, I made 2 of each (but one didn't make the photoshoot since it was an earlier version).


For the doll pattern debut, Wattle, Ivy and Poppy are first patterns in the library (still hoping for Jasmine, Marigold and Daisy too!!).  These are truly miniature versions of the full size girl patterns, but they close with velcro the entire length of the back so it's easy for little hands to dress their dolls themselves.  These doll patterns come in two sizes: 18" and 15" doll.  I sewed up the 18" sizes for our 3 brands of dolls (American Girl, Our Generation and My Life).  The 15" size fits Miniland/Minikane dolls (those are super cute by the way!!)


I sewed up Wattle in some knit scraps I had from Spunkin Honeyhead.  Jojo is a super cool girl with a purple streak in her hair.  She styles it with some mini chucks.


Next up is Ivy.  Vivienne is on her way to a summer wedding so she selected the maxi length and couldn't say no to the special touch of hand embroidery on the bodice using the Briar Embroidery pattern.


Of course I had to make a regular length version of Ivy too!  Julie is ready for a warm spring day, but secretly hoping for rain so she can jump in some puddles!


And here's Poppy!!  Bianca is happy girl who is always looking for the rainbow after the storm.  She was lucky and got a custom color rainbow on her bodice with the Iris Embroidery Pattern.


Another Poppy! Grace is a rock star in the making and is sure to dress the part in hopes her dreams come true.  She's rocking in GemStones Brights fabric by Riley Blake Designs and pulls out the pink accents of the fabric by styling this with her pink star glasses and cool pink boots.


I know most people make matching dresses to their daughters, but I was having too much fun raiding my scrap pile!  Which pattern will you be sewing first?!  (Poppy is my favorite of the bunch and I really need to sew up a tiered version!!)

{Little Lizard King} Roseville Hand Embroidery


It always pays to dwell slowly on the beautiful things -- the more beautiful, the more slowly.  -- Atticus

In a world that seems to be rushing by, I had the best time taking my time to create this stunning hand embroidery to add to my daughter's dress.  I'm completely guilty of adding a million things to my to-do lists and I realize that this *is* technically one more thing added, but it forced me to sloooow down and appreciate the art that I was creating stitch by stitch. 


Roseville
by Little Lizard King is a collection of hand-embroidery patterns that includes both floral and heart versions.  With a variety of sizes included, this pattern can help you embellish the smallest of pieces (like a hairbow or collar) to pockets to full bodice sizes.   I chose the full bodice size to pair with the Amsterdam Dress.


I was drawn to the floral version  -- it's a combination of stitches including French knots, modified lazy daisy, satin stitch, lazy daisy, woven wheel and backstitch.  As I went in search of coordinating fabric, I found a couple of yards of this bright floral print I'd picked up on clearance a couple years ago.  I love how bright and cheery it is!   Luckily, I am always saving my fabrics for "just the right project".  (My husband may disagree on that...HA!)


The great thing about embroidery floss is the variety of colors and can tailor the choices to suit your fabric.  I recently picked up a whole little kit and I was able to find several "perfect" matches.  Then, I had fun deciding each flower color.  After seeing all the other creations with this embroidery pattern, I can tell you it looks fabulous in all sorts of different color combinations. Each one is stunning.


The pattern comes with a great tutorial that thoroughly explains each step as well as an embroidery stitch guide for the design you choose.  This helps you quickly know how many threads you need for that step and whether it's single fold or doubled in the needle.   I used it as a coloring guide too so I could remember my choices!  

Also, don't be intimidated if you're new to hand embroidery.  I can count on one hand how many I've done!  You can absolutely create a beautiful masterpiece with little to no experience!


I added the embroidery pattern from the newborn-3m collar to the one of the ends of the 3" Nara Bow and I'm so smitten with how cute it looks!!


Slow down. Enjoy the process. Admire the beauty around you. Stop and smell the roses. 


Custom Post Signature

Custom Post  Signature