Image Slider

--------- {Testing, Testing} --------- Wimberley by Little Lizard King


I am thoroughly embracing Fall this year!  It's hard to believe that Thanksgiving is just two days away... where has the time gone?!!

I am so excited to share my version of the Wimberley Dress I tested for Little Lizard King!  Laci debuted her first pattern with LLK with the Roanoke and I am smitten with her designs.  When she called for testers for this dress, I immediately signed up.  I had my fabric picked from the moment I saw the options.   Usually I take forever deciding so this was a nice change.


Pattern Details:
  • Sizes 12m - Girls 12
  • Plain Bodice or Pintucked Bodice
  • Short, 3/4 Length, Long Sleeves
  • Elastic Banded Sleeve (Short Length)
  • Ruched Sleeves or Plain (3/4 Length and Long)
  • Gathered Circle Skirt with Ruffle or Simple Gathered Skirt
  • Scoop Back
  • Optional Waistband and Ties
  • Fabric:  Bodice- Knit  Skirt- Woven or Knit
  • Pattern Prints in Layers


One of my favorite details is the pintucks on the bodice.  I sewed this up in Off White cotton Lycra from Purple Seamstress.  Along each pintuck, I added crocheted lace from Hobby Lobby for added interest.  I wasn't sure how easy pintucks on knit would be, but they sewed up nicely.  The bodice is lined too and my lining matched perfectly with my pintucked bodice.  

One thing to note on the bodice, the clear elastic is optional to add, BUT I promise you, you will appreciate taking the extra few minutes to sew it on.  It really helps the knit from stretching out, both when attaching the skirt, and again from the weight of the skirt, especially the gathered circle skirt with ruffle.


I love the ruching on the 3/4 length and long sleeves.  It adds a bit more femininity and just the right amount of interest.  If you choose this option, be sure to stretch the elastic evenly as you sew so you end up with the perfect gathers.


Oh this back is just so sweet!!  If your child falls into a smaller size in the waist than the chest, be sure to grade down the sides to the smaller waist for a custom fit!  It will ensure that the scoop perfectly hugs the back rather than have any gaping.


I think this pattern can take you year round!  With all the different options, you can make them all unique too.


I chose to sew the Simple Skirt because I have been hoarding this Moda Autumn Woods for a while now.  I was able to cut a size 6 skirt from one yard of double border and I am pretty sure I had enough left in the middle that I could have added the optional waist and bow.  I decided to leave it off of this version, but it's a nice option to have and a great way to incorporate coordinating prints.


This was probably one of my daughter's best photo sessions yet.  I wish I could have taken her to the woods for a bit prettier background, but with school and the time change and then a school function, we didn't have time to trek the 20 minutes each way to our favorite "walking trail".  She worked the camera though! She had all her poses ready and she methodically went through them, pausing for me to focus and snap before moving on to the next one.  I seriously need posing lessons from her 😜


After pictures, we took advantage of all the leaves lying around!  Head to my Facebook page to watch the videos of her with the leaves!

She had so much fun throwing leaves around!  I'm not sure if my neighbors appreciated the leaves strewn about.... whoops!!

SAVE 40% SITEWIDE
Code: GIVETHANKS
Link to Little Lizard King Shop


{Tutorial} How to Match Fabric Print (and Stripes!) Across the Seam


If you know me at all, I am a complete fanatic about matching prints and stripes across the seams.  I am going to share my secrets today and show you it's really easier than you think.  It just takes a little bit of extra planning when you cut, and depending on your fabric repeat, it may take extra fabric.  I will be working mainly with matching across a button placket, but will guide you at side seams as well as stripe matching.    Oh, and NO WALKING FOOT REQUIRED!  (although, they are handy! -- these examples have all been sewn without a walking foot)

Ready?!

HOYA DRESS | Little Lizard King

STEP 1:  Important details to find out before you cut:  Check the pattern to see what your seam allowance is as well as how much the bodice overlaps (if you are matching across a placket).  Also, for stripes or any important skirt details, take note of the hem.  

PEGGY SUE & MERRY DRESS MASHUP | Little Lizard King

STEP 2: Take a look at your fabric.  What part would you like featured?  If you are matching across, a button placket, you will need to decide what part you want to fall where the buttons will be.  Pay attention to which side of the bodice will be on top.  I prefer the left side to be on top.   I iron a vertical crease here. Unfold.  Then add your seam allowance beyond that point.  You can also fold the SA on the pattern piece and then match the crease on the pattern to the crease in the fabric.

For example, I loved this red poppy on my Michael Miller Sommer print and wanted it featured in the center of the bodice:


*** When cutting stripes, decide what stripe color you want to be featured at the seam line of the waist or hem.


SUN DANCER DRESS | Little Lizard King

STEP 3:  Double check that your pattern piece is in the correct spot and that you have double checked the pattern for the correct seam allowance.  Go ahead and cut your first side.


STEP 4:  We will cut the second side, but you will need your first side handy.  You will take the first side, fold the SA under at the crease you ironed earlier.  Then, you will lay your bodice on the fabric (right side up), matching the print.  This is how your fabric will essentially look, after sewn.  Now, you will be cutting a reverse image of the first side.  Fold your SA on your pattern piece and turn it wrong side up.  With a pencil, draw a vertical line marking the part that will be covered by the overlap of the other side.  With the first side still laying in place, carefully position your pattern piece (wrong side up so it's a mirror image) under the first bodice side so that the vertical line you just drew on the pattern meets the folded edge of the first side.  Weight down the pattern.  Remove the first side from your cutting area and unfold the seam allowance on the pattern piece.  Weight it down (or pin) and cut your second piece!  Once you sew your bodice together and turn right side out, add your buttonholes and buttons per the pattern.  You should now have a picture perfect button placket (that may appear hidden, depending on your fabric and button choice).

*** To match across a seam, you will simply match at the point of seam allowance, as there is no overlap.

FOR STRIPES:  You must cut the second side with the same color stripe at the bottom of your pattern piece.


STEP 5:  This step applies to matching stripes and prints across a seam.  Pins will be your best friend.  Match your raw edges together, taking care to match each stripe.  I like to pin perpendicular so I can leave the pins in while I sew.  Especially with stripes, you will want to make sure every single stripe is pinned.


STEP 6:  If you are a speedy seamstress, you will need to S-L-O-W down for this step.  I sew fairly slowly here as to not shift my fabric between the layers.  Cross your fingers and open up that seam.... if it's a match, do a little dance!!!  If it's gotten off kilter at any point, I seam rip and redo.   I am a perfectionist though 😜


I challenge myself to see what I am able to match.  Here are some of my favorite examples:


Can you find the huge kangaroo pocket on the front?!


Happy matching!! 💗💗💗

{Testing, Testing} ModKid MARA & ModKid PERFECT TEE

*** This post contains affiliate links.  By purchasing through my links, I receive a small compensation -- aka money to spend on sewing 😉

It's no secret that I love sewing skirts.  My daughters love wearing skirts, especially my oldest.  At 8 years old now, she definitely needs to feel cool in my creations for her.  Modkid MARA SKIRT and the PERFECT TEE scored high on the cool factor.   These patterns come in both girls and tweens/teens, covering itty bitty 2t all the way to Girls 18!


The MARA SKIRT is designed for bottom-weight wovens, but I'm happy to report that I used quilting cotton in my test and it holds its shape well.  The pattern pieces are well labeled, complete with notches and everything you need to successfully sew your skirt.  The steps are well organized and are easy to understand with clear computer images.


The back is comprised of 3 panels and the front has 4, along with a fully functioning snap placket (sewn in a very genius way).  The skirt has been slightly slimmed at the side seams since this version was sewn.  Normally I stress about pattern matching across the seams and what not, but the fabric I chose was busy enough that it's not really noticeable.  I have not tried it with a classic geometric repeat to know how easy it would be to match it all up.  I may give it a go and report back in the future.


The PERFECT TEE is a slim-fit tee in both regular and cropped length and either short or long sleeves.  Miss 8 seriously loves crop shirts and I thought it would give the MARA SKIRT an "edgy" vibe.  We paired it with a sleeveless white jean jacket, funky short boots and sunglasses to complete the look.  


The fit has been perfected a bit beyond the version I sewed and I am itching to sew up another.  The pattern contains all the pattern pieces you'll need including the neckband piece.  This is one of my favorite things!  I really love not having to measure out my own neckband.  Another thing that sets this pattern apart from other basic tees is that the sleeves are not cut on the fold.  It helps achieve the perfect fit and live up to it's name.  Much like the MARA pattern, this pattern is easy to follow and professionally created.  The pattern also contains many tips and tricks for sewing with knit fabric.


Modkid was my first real pattern I sewed.  I sewed up the Addison, Doc McStuffin's style for her 4th birthday.  It's also the very first blog post I wrote (looking back, I cringe at what I wrote...lol).  Modkid has a special place in my heart.  I have always gotten great results and her patterns are very professionally written.

Head over to MODKID's brand new website and enter NEWSITE and save 40% off your entire purchase!  (48 hours only so hurry!!)

{BLOG TOUR} One Thimble Issue #17

Legalese: This post contains affiliate links.  By purchasing through my links, I receive a small compensation (for more sewing *of course!*).  
In exchange for this review, I was provided the full issue.  All opinions, comments and thoughts are all mine.


Oh my squee!!!  Temperatures may be falling here in the Northern hemisphere, but we're gonna party like it's heading into summer because it's ONE THIMBLE time!!  Issue 17 of One Thimble is a fiesta -- packed with fun patterns, inspirational articles and so much more.  After I share the details on what I've created, you can read my review on the whole issue.

 In case you are new to One Thimble, it is a quarterly digital sewing magazine with about 10 or more sewing patterns and several inspirational articles and quick tutorials.  This issue has 14 patterns, including the winners of One Thimble's "Gifts to Sew" Contest.  The cost for everything is $25 AUD (which is $19.15 USD) -- that's just $1.79 AUD per pattern ($1.37 USD)!!  Buy your copy HERE!  If you grab it before Nov 13, you also receive the cutest printable calendar for your sewing space!!


Included Patterns are:

  • Nori Dress (2-12) | Paisley Roots
  • Give Piece a Chance Crop Top & Skirt (2-12) | Duchess & Hare
  • Sol Dress (AUS XS-XL) | Tadah! Patterns
  • Festival Clutch (2 sizes) | Little Moo Designs
  • Big Day Out Jacket (3-12) | Ainslee Fox Boutique Patterns
  • Flora Fiesta Embroidery | Molly and Mama
  • Port Shorts (3-12) | Ainslee Fox Boutique Patterns
  • Taco Time! 3D Applique | One Thimble Exclusive
  • Posse Cadet Cap & Visor (Toddler to Adult) | Apple + Fig Patterns
  • Teacher's Gift Pack | .one + two.
  • Sewperior Fruit and Vegetable Bags (2 sizes) | Coco-Kalana
  • Fabric Wrap Bracelet (3 sizes) | Pattern Revolution
  • Miss Blossom Bunny Purse | Blooms & Butterflies Doll Studio
  • Blossom Flower Pin Cushion | My China Doll

I always like to try to tie my One Thimble sews together into one cohesive look so I chose to sew the Give Piece a Chance Crop Top & Skirt Set and embellished it with the Flora Fiesta Embroidery and accessorized it with a Fabric Wrap Bracelet.  It turned out exactly how I pictured it in my head 💗


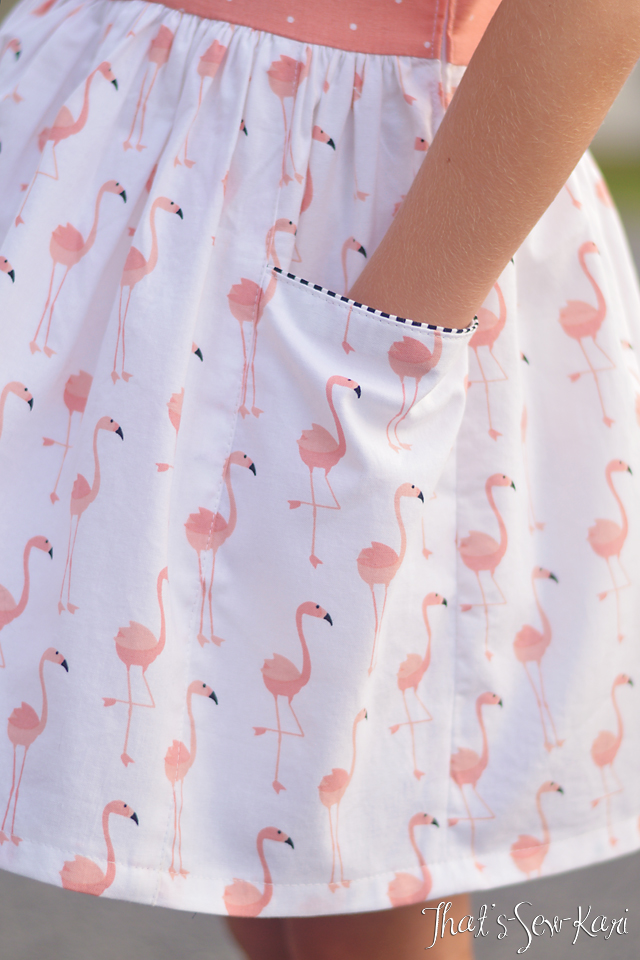
The Give Piece a Chance Crop Top and Skirt set is by Duchess & Hare.  It features a cropped, fully lined sleeveless top and a tiered, mid-calf length elastic-waisted skirt.  The top portion of the skirt is a half circle skirt and the lower portion is a gathered rectangle allowing you to mix and match fabrics and even include a border print.  The top is pieced together with optional flounces flanking the center panel.  The center panel is perfect to feature a favorite print or embroidery.  Because it's fully lined, all the seams are neatly tucked inside.

I found the perfect funky floral fabric at Hobby Lobby that inspired the whole look and used a small white dot on yellow to feature the Flora Fiesta Embroidery, making it pop in contrast.  I also added faux piping in lieu of the flounces.  I used matching embroidery floss from Hobby Lobby for the embroidery.  For the skirt, I used a solid black cotton.  I added the tie at the waist, partly for visual appeal, but also so my daughter can tell where the front of the skirt is!


The back of the top features the same paneling as the front and closes with buttons.


The Flora Fiesta Embroidery by Molly and Mama is my favorite thing!!  I have always wanted to try my hand at this and I decided this would be the issue that I would go for it.  I'm not going to lie, this took me f-o-r-e-v-e-r  to embroider.  I took my little bag to carline, my girls' choir practice, pretty much everywhere I went.  I sat up late several nights stitching after my girls went to bed.   IT WAS ALL SOOOOO WORTH IT!  If you have never tried it, please make it a goal to give it a go.  I am hooked!

I went a bit nontraditional and outlined the embroidery in a black thread.  Then I went back and filled in with color.   I think the outlining ties the look together with both the fabric on the side panels and the black and white stripe faux piping.


I thought the Fabric Wrap Bracelet by Sarah of Pattern Revolution would be the perfect accessory for my daughter's outfit.  There was one tiny problem.... the Fabric Wrap Bracelet comes in women's sizing.  I simply sized down the length (and slightly on the width for the ring I found) for my daughter and it worked!   I could probably take about a 1/2" off the length, but this just gives her room to grow. 😉  This was a SUPER quick sew so plan on making lots... ha!!


It was a blustery 45-degree day here so I will be packing this outfit away for a few months, but I know my 8 year old will be wearing it the moment the weather warms back up.

There are so many more fun patterns that I cannot wait to get to.  The Miss Blossom Bunny Purse is definitely at the top of the list.  As soon as I figure out Easter dress fabric, I will sew each of my girls one to coordinate.  The Nori Dress will also be sewn as it gets closer to next summer because that dress is so fun and I love the funky vibes it exudes.  I am also excited about the Big Day Out Denim Jacket because my daughter had one .... until she lost it.  Although, she's probably outgrown it by now, but man, I loved using that jacket to coordinate with outfits I had sewn.  What patterns are at the top of your list?!

I love that One Thimble is more than just a group of patterns.  The layout and photography is so inspiring.  Each time I am blown away by the talent behind the scenes.  I don't know how everyone else reads OT, but this issue, I was inspired to grab some guacamole and tortilla chips instead of my usual coffee.  

The articles included are a range of helpful to inspiring to fun little add-on projects.  They are divided into 4 categories: 

Regular Columns:  Here you will find Trending Fabrics, the latest in the Stitches in Time story, Details about the Next Issue, Coupons & Discounts, etc.   My favorite article in this section is Stitches in Time  I cannot wait to see what happens next!  The awesome thing is, I can go back to my previous issues and refresh my memory on the story thus far.  I found myself nodding right along with this installment because it really happens in our online sewing community.

Special Features: I really enjoyed reading 10 Tip for Faster Sewing.  I am like the world's slowest seamstress (hence the many nights embroidering a seemingly small area) so this article has inspired me to implement some of the included tips.  There may be hope!  I also liked Sew Giving - Tiyamike Sewing.  Jo is so inspiring and the gift she is teaching these women is immeasurable.  Definitely a must read.   The Handmade Christmas article brought back memories from my teenage years where my sister and I would pick a Christmas craft to make for gifts.  I still have many of the creations we each made.  In a world that has become so materialistic, I think it would be nice to gift from the heart rather than the wallet.

Techniques & Tutes:  There is a super awesome tutorial for a Fringe necklace which I totally would have made if I hadn't embroidered the crop top.  It looks fairly easy and quick!  There are also tips on working with trims and denim (both very useful in this issue).  

Handmade Business: I loved the article on IG Stories.  I haven't really tried IG stories, mainly because I had no idea what I was doing...LOL  But, I now have a better understanding on how they are useful.  I totally agreed with  the article on the Value of Word of Mouth.  It is super important.  I am intrigued by the podcasts article.  Am I the only one still living under a rock, having never listened to a podcast?? Please tell me I am not the only one.  LOL

I know I have said this literally every single One Thimble, but this issue does not disappoint!!  There are so many goodies and inspiring articles that I simply cannot list them all.  

For more One Thimble inspiration, visit the other blog tour stops!

{BLOG TOUR} This & That by Jill Finley for Penny Rose Fabrics


Woo-hoo!!  It's FINALLY fall here in the Carolinas.  I am thrilled to join the blog tour for Jill Finley's newest fabric line for Penny Rose Fabrics, "This & That".  It is the perfect palette to kick off my fall sewing.  The main print in this collection is full of gorgeous blooms in vibrant reds, yellows, pinks and greens on either a red, black or white background.  The coordinating prints in the collection compliment each other perfectly.


I selected three prints: This Main White, This Graphic Yellow, and This Script Red and chose to sew my daughter a Roanoke Dress by Little Lizard King and then I added a "little bit of this"and a "little bit of that".  I think with a simple change of the shoes, my daughter can also carry this dress on into the spring.


The Roanoke Dress features a gorgeous split bodice design, but I saw this remnant of wide lace in my sewing stash and loved how it contrasted against the cheery yellow bodice.  


I omitted the pintucks in the skirt in favor of adding my new favorite pockets, the Emory Pockets (free in the Izzy & Ivy Design group on Facebook).  I thought the pop of red from the This Script Red was the right amount of accent.  I lined the pockets with the This Graphic Yellow.


This Script fabric is full of two items that often are paired together.  It's fun reading all the pairs.


Obligatory back picture 😜  My daughter has taken so many pictures over the past few years, she knows all the angles I need to shoot.  LOL   It takes more time to get ready for photos than it actually takes to capture them.  I really would have loved to have taken her to a local park with a little walking path, but photo shoot day was packed with the School Book Fair and a Soccer Banquet that a trip across town to the park could not be squeezed in.  Luckily, our street is lined with some gorgeous fall trees.


With those fall trees come fallen leaves!!!  She had an absolute blast gathering leaves and tossing them into the air.  She absolutely loves her new dress. When I finished sewing it, she gasped and said how beautiful it was.  She looks absolutely radiant in her pictures which is the true test of how much she loves it.

For more "This & That" inspiration, including some gorgeous quilts, be sure to visit these other stops on the tour:

Nov 8th  Ameroonie Designs
Nov 9th  Debby Brown Quilts
Nov 10th That's-Sew-Kari

Thank you Penny Rose Fabrics for these gorgeous fabrics!!!

Custom Post Signature

Custom Post  Signature