

I don't know about y'all, but sometimes I dread cutting out my sewing projects, especially if it has a million pieces. Luckily, I can now hand this task off to my Cricut Maker and the fabulous rotary blade! Not only does Design Space offer hundreds of sewing projects pre-designed, you can also design your own.
One of my favorite sewing patterns is Amsterdam by Little Lizard King. I've made countless since it came out -- but I had yet to try the quilted skirt option included in the pattern. Why? I really did not want to cut 64 squares by hand... lol. Quilting is precise and each cut must be just as precise. That's 64 squares of pressure ~ HA!
Here's how you get your {Cricut Maker} to cut a quilted skirt for you:
1. Figure out the number of fabrics you'll be using. I needed 64 squares so I chose 8 different fabrics.

2. Open Design Space. Click New Project. Under SHAPES, choose the Square. Then edit the dimensions to the size you need. Since I used the Amsterdam Dress, I consulted the Cut Chart included in the pattern and changed the dimensions to those that coordinated with her size (the size below is the default size) ** Be sure unlock the lock if you your length and width are different numbers.

3. Once you get your square sized how you need it, choose the DUPLICATE button on the right side of your screen. Duplicate it until you get the number of squares to equal the number of fabrics you are using. Change each square to a separate color. It doesn't matter how they are arranged on the screen. (Cricut will arrange the cut mats for you.)

4. Click MAKE IT (green button on right side in above picture). Then change the quantity of PROJECT COPIES to the number you need of each fabric. I chose 8 fabrics and need 8 cuts each to equal 64 squares. Change the mat size to 12x19 (if you are using fat quarters!) or 12x24 (if you are using normal fabric or Cricut precuts).

5. Prepare your 1st mat. I chose the Jubilee Fat Quarter package from Cricut so I needed to cut my fat quarters down to mat size. (If you choose the 5-pack precuts, this is done for you already!) I grabbed my Cricut Self-Healing Mat, my Cricut Acrylic Ruler (which is perfectly sized to the extra-long mat) and my Cricut 45mm Rotary Cutter. (Side note: Cricut's Rotary Cutters have a locking mechanism which protects the blade when not in use. It really makes me feel safer knowing my girls won't be able to injure themselves on it by accident.)
TIP: Pay attention to the direction of your fabric pattern!!

Starting at the top edge of your mat, gently unroll your fabric onto the mat, right side down.

Smooth out the fabric onto the mat. I prefer to use the Cricut Brayer Tool. It eliminates all bubbles!

6. Head over to your Cricut Maker, turn it on and insert the Rotary Blade. (I have it displayed on the front for you). To cut your first mat, click continue on the the lower righthand of your screen. It will connect to your Maker. Then, select your material type -- I used Cotton under the Fabric section. Load your mat and press Go when it flashes. Unload your mat after the cuts is finished. Remove your pieces.
Repeat this process until you have cut all of your mats.

After you have cut all of your pieces, head over to your sewing machine and start sewing. If you are following the Amsterdam Pattern, detailed instructions are included. If you have created your own, sew one row together. Repeat until you have all of your rows. Then assemble your rows together, half for the front of the skirt, half for the back. Topstitch all of the seams down. Then sew the front skirt to the back skirt, just as you would for a normal skirt/dress! Finish constructing your dress per the pattern.
That's it!!

Because I used my Cricut Maker, all of my squares lined up perfectly!!! Hooray!!
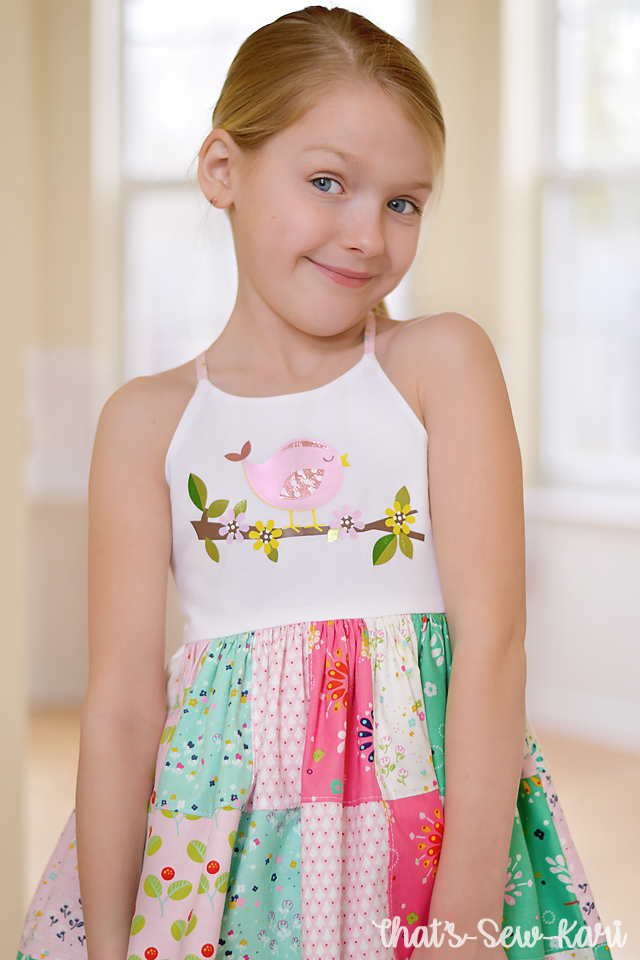 |
| I couldn't help but add some Iron-On one the bodice. My daughter saw this cute little bird in Design Space and had to have it! |
Treat yourself to a Cricut Maker (or add it to the top of your wishlist) and save time and energy cutting to spend more time doing what you love -- sewing!!
This is a sponsored conversation written by me on behalf of Cricut. The opinions and text are all mine.


Be First to Post Comment !
Post a Comment