Image Slider

Sleep Tight {Meow and Forever}


Calling all kitty lovers.... the purr-fect fabric has arrived!!!

Meow and Forever by My Mind's Eye for Riley Blake Designs is such a cute collection.  Its color combination of pinks, blacks and white with a pops of yellow are so charming.  


 When I browsed the collection to place my order, I originally had a skirt design in mind with a coordinating kitty face raglan planned for my youngest daughter.  However, when I opened my package, I had visions of the cutest little summer pjs for both of my girls!

I selected Meow and Forever Faces BlackMeow and Forever Heads Pink and Meow and Forever Paws in Pink and White.


I quickly switched gears and grabbed my Adelaide Pajama Set by Little Lizard King.  I had ordered just a half yard of each of the 4 prints so I altered the top pattern by removing some of the width in order to fit tops in just a half yard.  I also shortened it a couple of inches because I accidentally cut it out with the paw prints upside down and then had to fix my mistake -- whoops!!  Happy accident.


For my youngest daughter, I paired the Kitty Faces Black with Paws Pink.


For my oldest, I chose the Kitty Faces Pink and paired it with the Paws White.  My two girls wear the same size too (despite being 22 months apart) so they can mix and match the two sets.


Aren't these the cutest pj shorts ever?!  I added a small faux tie to the front of the shorts so my girls know which way is the front.


Definitely check your local quilt shop or online retailer for these cute prints!!

Sewing and the {Cricut Maker}


I don't know about y'all, but sometimes I dread cutting out my sewing projects, especially if it has a million pieces.  Luckily, I can now hand this task off to my Cricut Maker and the fabulous rotary blade!  Not only does Design Space offer hundreds of sewing projects pre-designed, you can also design your own.

One of my favorite sewing patterns is Amsterdam by Little Lizard King.  I've made countless since it came out -- but I had yet to try the quilted skirt option included in the pattern.  Why?  I really did not want to cut 64 squares by hand... lol.  Quilting is precise and each cut must be just as precise.  That's 64 squares of pressure ~ HA!

Here's how you get your {Cricut Maker} to cut a quilted skirt for you:


1.  Figure out the number of fabrics you'll be using.  I needed 64 squares so I chose 8 different fabrics.


2. Open Design Space.  Click New Project.  Under SHAPES, choose the Square. Then edit the dimensions to the size you need.   Since I used the Amsterdam Dress, I consulted the Cut Chart included in the pattern and changed the dimensions to those that coordinated with her size (the size below is the default size) ** Be sure unlock the lock if you your length and width are different numbers.


3. Once you get your square sized how you need it, choose the DUPLICATE button on the right side of your screen.  Duplicate it until you get the number of squares to equal the number of fabrics you are using.  Change each square to a separate color.  It doesn't matter how they are arranged on the screen.  (Cricut will arrange the cut mats for you.)


4. Click MAKE IT (green button on right side in above picture).  Then change the quantity of PROJECT COPIES to the number you need of each fabric.  I chose 8 fabrics and need 8 cuts each to equal 64 squares.  Change the mat size to 12x19 (if you are using fat quarters!) or 12x24 (if you are using normal fabric or Cricut precuts).


5. Prepare your 1st mat.  I chose the Jubilee Fat Quarter package from Cricut so I needed to cut my fat quarters down to mat size.  (If you choose the 5-pack precuts, this is done for you already!)  I grabbed my Cricut Self-Healing Mat, my Cricut Acrylic Ruler (which is perfectly sized to the extra-long mat) and my Cricut 45mm Rotary Cutter.  (Side note: Cricut's Rotary Cutters have a locking mechanism which protects the blade when not in use.  It really makes me feel safer knowing my girls won't be able to injure themselves on it by accident.)

TIP:  Pay attention to the direction of your fabric pattern!!


Starting at the top edge of your mat, gently unroll your fabric onto the mat, right side down.


Smooth out the fabric onto the mat.  I prefer to use the Cricut Brayer Tool.  It eliminates all bubbles!


6. Head over to your Cricut Maker, turn it on and insert the Rotary Blade.  (I have it displayed on the front for you).  To cut your first mat, click continue on the the lower righthand of your screen.  It will connect to your Maker.  Then, select your material type -- I used Cotton under the Fabric section.  Load your mat and press Go when it flashes.  Unload your mat after the cuts is finished.  Remove your pieces.

Repeat this process until you have cut all of your mats.


After you have cut all of your pieces, head over to your sewing machine and start sewing.  If you are following the Amsterdam Pattern, detailed instructions are included.  If you have created your own, sew one row together.  Repeat until you have all of your rows.  Then assemble your rows together, half for the front of the skirt, half for the back.  Topstitch all of the seams down.  Then sew the front skirt to the back skirt, just as you would for a normal skirt/dress!  Finish constructing your dress per the pattern.

That's it!!


Because I used my Cricut Maker, all of my squares lined up perfectly!!!  Hooray!!
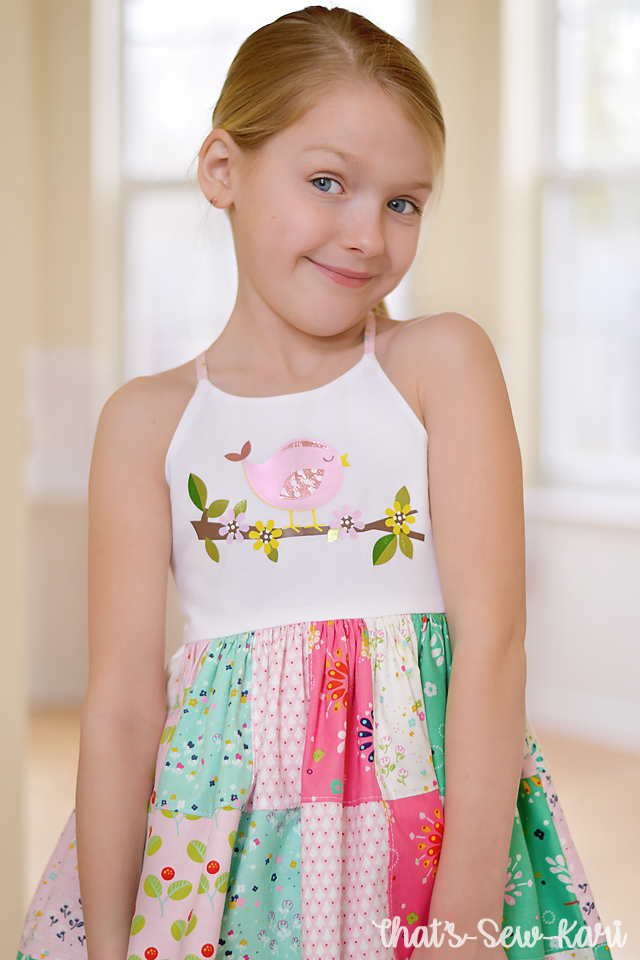
I couldn't help but add some Iron-On one the bodice.  My daughter saw this cute little bird in Design Space and had to have it!

Treat yourself to a Cricut Maker (or add it to the top of your wishlist) and save time and energy cutting to spend more time doing what you love -- sewing!!


This is a sponsored conversation written by me on behalf of Cricut. The opinions and text are all mine.

In the Meadow by Keera Job Design Studio for Riley Blake Designs


"May you be like a -wildflower- growing gently in the beauty + joy of each day..."


In The Meadow by Keera Job Design Studio for Riley Blake Designs is full of floral charm -- bright wildflowers, bumble bees and a coordinate of inspirational quotes.  

Photo Credit: Riley Blake Designs
Aren't those so pretty?  And the bees are the cutest!!  I selected In the Meadow Main Navy and In the Meadow Text Pink.  I used the pink to line the bodice and centered the opening quote which is one of many quotes on the fabric.  I hope these quotes give her the quiet strength to embrace her whole self 💗

See the Storyboard here to get inspired!


I knew this fabric was perfect for Spring/Summer so I wanted to sew a sundress.  As I searched through my patterns, I was drawn to Augusta by Little Lizard King.  I had previously sewn a maxi version of this pattern and truth be told, kind of forgot about it! Now, I definitely need to sew a few more!


I love the contrast of the deep blue background with the pop of wildflowers against her skin.  It makes me wish we really had fields of wildflowers growing in February to go frolicking.


The sweetheart neckline option is so gorgeous!

I love that Riley Blake Designs uses quality cottons so no matter what fabric you order, it will always be soft, easy to care for and sews up with ease.  My girls' closets are quickly being filled with Riley Blake Designs. 💗

Simple Goodness by Tasha Noel for Riley Blake Designs


Eeek!  I'm showing off the cutest fabrics today!!

Simple Goodness by Tasha Noel for Riley Blake Designs is a throwback to simpler times.  It's full of bright and cheery colors and is making me wish it were summer already!!

Photo Credit: Riley Blake Designs

As soon as I saw the fabric selection, I noted a few things: 1) I need the main print in the aqua colorway for my little blue-eyed blondie 2) I have the perfect dress pattern for this and 3) There's no way I can narrow down the coordinates so I'm going to create a fabric bunting to show several off!  Read below to see how to create it for free!


To showcase the main print, I turned to my favorite summer dress ever - Amsterdam by Little Lizard King.  It's incredibly quick to sew, and is always a perfect fit for my daughters.  I love the unique back.  I was originally planning to use the Simple Goodness Bias Stripes Pink for the bodice, but when I opened my fabrics, the Simple Goodness Checker Dots Red just made all of the pictures on the main print pop.  I cut the straps from Simple Goodness Mini Flowers Aqua.


  1. Download the FREE pattern by clicking the button below.  Save it to your computer and then open it using Adobe Acrobat Reader DC.  Print it out at 100% scaling.  Verify that the 1" square is accurate.
  2. Cut 24 triangles (12 main, 12 lining).
  3. Cut (2) 2"x 44" (LxW) strips of fabric.  Sew 2 short ends together to create 1 long strip.  Fold the short ends in 1/4" inch.  Fold in half so the long edges meet. Press. Open the fabric back up and bring each long edge to the middle crease you just created.  Iron well.  Fold it back to the original crease.  Press.  It should now be 1/2" x 87" and should resemble double fold bias tape.  (You may also use double fold bias tape.)
  4. Take your triangle pairs and sew them right sides together along the two diagonal sides with a 1/4" seam allowance, leaving the top edge unsewn.  Trim seam allowance in half, turn right side out.  Be sure to take care when poking out the bottom point.  Press well.  Topstitch along the sewn edges, 1/8" from the edge.  (Tip: To avoid the bottom tip getting stuck in your feed dogs when pivoting, topstitch down to the corner from one side.  Backstitch at the corner and clip your threads.  Turn your triangle over and repeat with the other edge, starting at the top.)
  5. Starting about 1/2" from the center, sandwich the top of the bunting triangles in the fabric strip. Secure with pins.  Working towards one end, place each triangle about 1" away.  Once you place your first 6, work from the center again towards the other end to place the remaining ones.
  6. Sew the fabric strip along the edge, 1/8", securing each bunting triangle.
  7. Tie the ends into a bow, if desired.

My daughter fell in love with all the little scenes on her dress.  She thought she was the little blonde girl, feeding the chickens.  If only I could have borrowed some chickens for the photo shoot...lol  (oh, and some green on the trees!)

Thank you Tasha Noel and Riley Blake Fabrics for the adorable fabrics!  We are putting the bunting back up on Monday for this little lady's 8th birthday!!


Custom Post Signature

Custom Post  Signature