Image Slider

Flower Market by Jen Allyson for Riley Blake Designs


Happy December!! While the holiday season is full swing -- decorations are up and Christmas Eve dresses are complete -- I was happy to play with some Spring goodies! 

Flower Market by Jen Allyson for Riley Blake Designs is simultaneously sweet and bold.  The delicate florals paired with the striking geometric prints make for an exciting pairing.   Take a look below! Isn't it completely gorgeous?!


I chose Flower Market Gingham Black, Flower Market Wallpaper Teal, Flower Market Hoops Coral, and Flower Market Folk Cream (for lining).  It's not a typical pairing for me so I stepped outside of my comfort zone, but as I played around with the swatches in Photoshop, a little outfit idea emerged and I was excited to see it come alive.


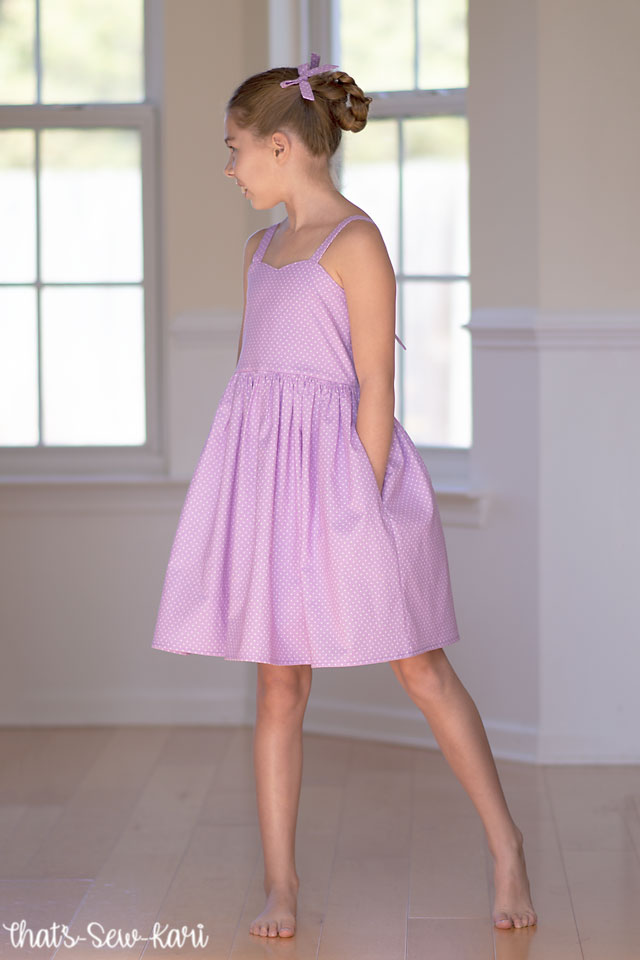
To create this outfit, I used patterns from 3 different designers and then paired it with her tall black boots and knee high socks!  For the top, I chose Bristol by Little Lizard King.  I love the arched bodice seam that also creates an instant high-low -- perfect for shorts to peek out.  I omitted the ties at the sleeves and used the sleeve binding from the Roanoke Pattern.

I can see this top being paired with some simple jeans too!


The back is just short enough that her shorts can peek out.  The bold shorts with the dainty floral is such a striking contrast that I really like together!


I turned to one of my favorite shorts pattern -- Clover Shorts by Mouse House Creations (affiliate link).  The shorts are a bit dressier than most shorts as they are pleated in the front and also have cuffed bottoms and pockets!!.  Because the front piece is pleated, it's not a straight cut so my gingham appears to be a tad wonky.  I promise you though, it was unavoidable to keep the pattern piece on the grainline...lol.  The back looks perfect though! HA!  I love adding the pockets and french-seamed them so it's nice and tidy inside.

She's currently in between sizes but since she likely won't be wearing these much until Spring, I sized up so they'd fit her in a few months!


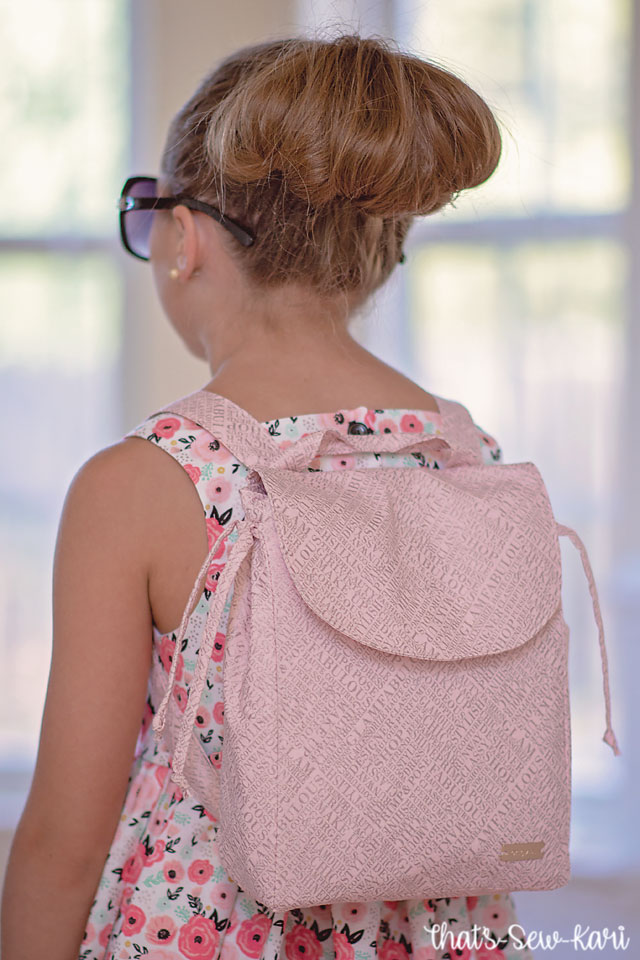
The messenger bag style purse is the Pinky Promise Bag by Little Moo Designs and I think this is like the 7th one I've sewn.  It's my go-to purse for my girls!  I chose the Hoops in Coral to tie everything together.  The coral picks up the flowers in the top and the black accents compliment the shorts.

She will surely fill this bag with treasures to bring when we are out and about.  She rarely leaves the house without a purse.  She always wants to be just like me!


What fabrics would you pair together?


{Blog Tour} One Thimble: Issue 22


One Thimble has been an inspiration to me over the years so when they announced they were taking a break after Issue 20, I have to admit I was sad.  I was thrilled, however, to see them return late summer for Issue 21.  I didn't have a chance to hop on the blog tour then due to other commitments, so I was patiently waiting for Issue 22!

One Thimble is an e-zine with several patterns, a few hacks of previous patterns and a slew of inspirational/educational articles -- all for just $12 AUD (which is just over $8 USD currently!)  Each edition has a theme that carries throughout it.  This edition's theme is "Day Tripping".

I originally signed up to sew the Oceaan Shorts by The Eli Montser because I cannot resist a sailor short!  Of course, I couldn't just stop at one pattern and also sewed up Xanadu Bodysuit (in crop view) by Duchess and Hare and the Piper Pinny by Bubby and Me Creations.


I chose a classic denim for the Oceaan shorts for maximum wear.  I was happy to see that an adjustable elastic waist is included in the pattern.  I initially had a couple of hiccups with a couple of the pattern pieces but those were all resolved as of last night!


I am digging the longer inseam length too.  They will be the perfect length to wear to school.  While my girls are thin, lately I've not had to really blend much on shorts/pants.  My girls' hips put them between a 6 and 7 hip so I sewed up a straight 7 since they are a 7 height.  The buttonhole elastic was able to cinch up the waist as needed.


Styled and ready for a day out on the town (except it's cold here so we pretended...lol) -- pictured with the Pinky Promise Bag from Issue 19.


The Piper Pinny was a last minute added pattern to my sewing list. My oldest saw it and immediately needed it.  Bubby and Me Creations is a new-to-me pattern designer and I'm super impressed!  It came together easily and perfectly in just a short time. (My youngest wants to know where her Piper Pinny is... good thing I liked making it!)


I paired it with the Xanadu Bodysuit by Duchess and Hare.  I know her patterns are really well drafted.  I sewed up the crop top for my tween, but I also know she'll be wanting a full bodysuit.
This pattern is suited for those that have prior experience with knit bands.  


I added some funky buttons that I picked up at Hobby Lobby along the way somewhere.  I thought hamburger and fries screamed tween scene.


I also got to peek at the full issue and once again the articles are just in time for things I needed to read.  I thought the article "It's Okay Not to Sew" was interesting.  I've experienced small bouts of not wanting to sew (also from prolific sewing), but I think my is more because I'm sleep deprived and have got to get my energy back.  HA!

I also really loved the style guide because as a sewist heading into winter with Aussie Summer patterns, I could have tapped into the creativity included and sewn something seasonally appropriate.  (It's a bit fun sewing for another season though.  I'm already over the cold weather. LOL)

I'm hoping to carve out time for tackling some of the projects on the Holiday gift guide because I had forgotten about many of them!! I own most of the issues and could see myself sewing up a number of these projects.

Enter to win!!

For your chance to win a copy of the new One Thimble Issue 22 - Summer 2019 please enter the rafflecopter prize draw here.Open until 12am Wednesday November 20th AEST


We have some amazing bloggers joining in to share their makes this week. Be sure to check each one out on the tour and show them some love.

November 13


November 14


November 15


November 16


November 17


November 18


November 19


Riley Blake Designs Basics {Swiss Dot}


Everyone loves a good basic!  They make fantastic coordinates, but I also love using them as my main fabric too.  Riley Blake Designs has an entire BASICS catalog.  Last time, I played with the stripes from the basics, but I also love polka dots so I decided to check out the Swiss Dot collection.


When I first heard Swiss Dot, my mind thought it was dotted Swiss because I seen the terms used interchangeably.  However, Swiss Dot refers to a pattern of tiny dots on fabric, not necessarily the raised dots (dotted Swiss).  What's great about Riley Blake's Swiss Dot collection is the variety of colors.  Seriously, there are SO MANY SHADES!


Maybe the cooler weather already has me dreaming of Spring, but I was drawn to the pastel shades.  I let my girls pick their own color and my oldest chose Lavender and my youngest chose Mint.


I sewed up Malibu by Little Lizard King because it was similar to the style of dress they requested, but the elastic at the back is a bit more forgiving in the event that they grow before Spring...lol


I paired the mint with Off-White Linen at Riley Blake designs and I love them together. 


As I was cutting this out, I decided last minute to add a full ruffle hem.    I may add ruffle hems to everything now!!  To get perfectly gathered ruffles, sew one gathering stitch within your seam allowance and a second row of stitches outside of your seam allowance.  This prevents your ruffles from shifting during the sewing process.  After the ruffles are attached, remove the outer gathering stitch and press!  (PS... this works on gathered skirts too!)


I made my oldest a simple Malibu.  She has been crushing on purple lately so she really loves this Lavender. 


She asked where her bottom ruffle was.... whoops!!!  The ruffle definitely adds to the twirlability!


I made up for the lack of twirl with the hidden side seam pockets!!  Whew!  I also sewed up some skinny bows (Sweet Red Poppy) to add to her hair!


What colors would you pick??  CLICK HERE

{Collaboration} Peeping Pipers by Kristina Hunter of Arthousewife


When I started sewing 7 years ago, I never anticipated the social connections I'd make.  Of course, I'd think a lot of us could say the same.  Social media has exploded over the last decade and has created new ways for paths to cross.  This is how I came to meet Kristina Hunter of arthousewife online, or should I say how she came to meet me.  Kristina is a surface pattern designer who loves color, kid's prints and all things retro.  She contacted me to see if I was up for a collaboration with her designs.  I was intrigued so I took a look at her work on Instagram and Spoonflower. I really liked her artwork and could see my girls wearing so many of them!


After liking so many of her designs, my eyes were drawn to Peeping Pipers on the gorgeous deep turquoise background.  My youngest loves animals of all kind so I knew she'd really love it.  As I showed her Kristina's Spoonflower shop, I wasn't surprised when she picked out the same print!  (Of course, I had partly picked it out because I knew her new little brown boots would look so good with this print!)


Kristina Hunter's designs can be printed by Spoonflower on a plethora of substrates which is really pretty cool!  I'll admit that I actually hadn't ever ordered from Spoonflower before.  I've known others that have, but I hadn't ever really looked into it.  I am really impressed.  I ordered the Cotton Spandex Jersey and determined it was the best fit for my selected pattern.  Because it was a custom job, I wasn't sure how long it would take, but within 11 days, I had my fabric (after being ordered on a weekend!)  It arrived with recommended care instructions too.


I couldn't resist sewing up yet another Wimberley by Little Lizard King.  It's the quintessential Fall knit dress with the ruched 3/4 sleeves.  While the gathered circle skirt with ruffle version takes 2 yards, the fabric and time spent gathering is SO worth the outcome.  I prefer to hand gather so I quarter the bottom of my skirt and ruffle.  Then I pin the quarters and gather between the pins. (Make sure you have lots of pins... it's about 16 feet of ruffles gathered!)


We had a bonus day off school so my daughter and I drove to our favorite picture spot -- a little shopping community in a neighboring town.  It took longer to drive than it did for her to deliver some really great pictures.  It's always really easy when she loves her outfit though!


A couple months ago, I sewed up the Madison Vest by Little Lizard King in a cream fur and it's proven to be the best little Fall wardrobe accessory.  It pairs well with so many things!


Her Fall wardrobe is looking SO good.  What should I sew next?


Be sure to check out Kristina Hunter's Instagram and Spoonflower Shop -- I think you'll fall in love with her designs like I have!!

{Riley Blake Designs} Designer Knits


Yay!!!  Riley Blake Designs' Designer Knits selection is growing 💗  Over the past few years, knits have inched their way to being my favorite fabric to sew.  My girls reach for their knit selections far more frequently as well.

I was even more excited to see Glam Girl included in the next wave of knits arriving.  (Visit that post here).  I quickly decided on the Glam Girl Black Floral Sparkle and the coordinating Glam Girl Main Pink Sparkle

Y'all -- when it arrived, I couldn't believe how soft it is!!!  Downright dreamy.  It's a 4-way 50% stretch 95/5 cotton Lycra blend.  It had minimal shrinkage, low curling when the edges were cut and was super easy to sew.  The greatest testimony: the bottom ruffle of my dress is about 17-feet long and I didn't feel like pulling my hair out sewing it!!  HA!!


I knew I was going to turn the Black Floral Sparkle into a Wimberley Dress.  I'm obsessed with that pattern at the moment and my daughter is too!  I originally got the Main Pink Sparkle to sew up some shorties to wear underneath her twirly dress but then I decided it was far too pretty of a knit to hide under a dress.  I grabbed my pattern piece for the Tacoma Cardigan and had just enough for the single ruffle version.  Both patterns are by Little Lizard King.


  I normally cannot pass up the ruched sleeves on the Wimberley Dress, but thought they might be a bit bulky under the sleeves of the cardigan so I decided to make it sleeveless.  Fun fact:  Sleeveless isn't actually an option in the pattern, but I just used the "burrito roll" method to sew up the armscye and I was on my way.  


The scooped back is so sweet.  I used a lightning bolt stitch on the inside of my bodice and didn't have any problems with wavy seams.  To attach my skirt, I add clear elastic to the bottom of the bodice to help stabilize the weight of the skirt added on.  I then zig-zag the skirt on in order to catch part of the clear elastic in the seam allowance.  


Because this knit is so soft, the drape is really amazing.  This is a gathered circle skirt with added ruffle and it just falls so nicely into place.


The rose gold sparkle on pink is really stunning in real life.  This cardigan is unlined and while the knit has great drape (especially when it's all gathered), it has enough structure for unlined projects. Bonus: This cardigan will pair nicely with the Glam Girl woven Siena Dress I made last month!  #winning

I am so incredibly impressed with the quality and softness of this knit.  I highly recommend!!! Thank you Riley Blake Designs for this happy mail package!!

Glam Girl by Dani Mogstad for Riley Blake Designs


Ooh la la...

    There are certain fabric collections that the moment I look at them, I know exactly which daughter needs it in her life.  When I first saw Glam Girl by Dani Mogstad for Riley Blake Designs, I knew my oldest would be in love!  This stylish collection is full of fashion, flowers and stunning plaid and comes in 3 colorways - black, white and mint.  Pops of pink and rose gold sparkle add some extra fanciness.


Immediately my eyes were drawn to that the black plaid peeking out from the stack above.  I also loved the florals.  It was a super hard decision and my original plan was thwarted by my procraftination.  Then I had a tentative plan B, but even that evolved once I started creating.  I really love the end result, but more importantly, so does my daughter!

I ended up choosing the Glam Girl Floral White Sparkle, Glam Girl Words Pink Sparkle, and the Glam Girl Panel Mint Sparkle

Glam Girl Panel Mint Sparkle -- photo from Riley Blake Designs


My original plan was to create both a dress and a coat (using the Glam Girls Plaid Black Sparkle as the outer layer and the Words Pink Sparkle lining) but.... I didn't (a story for another day).  HA!!

As I looked at the quilt panel that I impulsively requested (which by the way, I don't quilt...lol), I knew I wanted to incorporate at least one of the quotes somewhere on my dress.  I turned to the Siena Dress by Little Lizard King which features a center panel (which was just the right size!).  I omitted all of the optional ruffles as I wanted the dress to be as sleek as possible.

I chose the "Love your fabulous self" block because it's such an important message for all ages to be reminded of, but especially for these tween years as she inches closer to middle school.


 I added side seam pockets because my daughters are obsessed with them and they are so easy to add!! 


Every "Glam Girl" needs the perfect accessory and right now, the words "mini backpack" are thrown around my house daily (and every time we go to the store).  I knew the Glam Girls Words Pink would look amazing sewn up as a mini backpack.  I started with the Animazing Messenger Bag by Little Lizard King and used the free Animazing Backpack Add-on and added a few of my own touches.

The rose gold sparkle on the light pink completely has my heart!!  I kind of want to keep this backpack for myself 😂 Oh, and don't worry about the sparkle needing special ironing instructions -- I ironed using my normal heat settings!


I added a little handle at the top just because and side ties to help keep it cinched at the top.  I also used a magnetic snap to keep the flap in place in lieu of a button with loop.  Inside, I added a smaller pocket than the pattern called for using the quilt block (from the panel) "Happiest girls are the prettiest girls."  However, it was hard to photograph it inside once the backpack was all put together (whoops!).


This fabric is released and currently available!!!  Check your favorite online retailer and local quilt stores.  I've got to find some of that black plaid so I can make that jacket I was dreaming of!!  Thank you Riley Blake Designs for this gorgeous package of fabric!!

I will be framing some of the remaining quilt blocks to hang in my daughter's Paris-inspired room.  I may make a couple of small pillows too for her bed.  What's your favorite tiny panel pattern?

♥ ♥ ♥ Have a fabulous day! ♥ ♥ ♥

{Riley Blake Designs} Llama Llama Flannel Pajama

Llama llama, bedtime drama.... I don't know about y'all, but the moment bedtime rolls around, drama ensues at my house.  I'm not sure what it is about bedtime that my kids (namely my youngest) seem to actively refuse to participate, but oh my, it's my nightly struggle.  My oldest decides it's suddenly time to play and my youngest has an entire list of antics to run through (really, she wrote it down once...lol). Please tell me I'm not alone!!

As soon as I saw Flannel Novelty Llamas by My Mind's Eye for Riley Blake Designs, I knew my girls needed some new pajama pants.  I was super excited that these llamas come in 3 colorways -- pink, teal, and white.  My oldest loves pink and my youngest loves teal so this collection caters to both!  The little llamas are super cute and the flannel is unbelievably soft.

Me: It's time for bed.... 
Her: I DON'T WANNA!!!  

I used the Adelaide Pajama pants by Little Lizard King to sew up these cozy pj pants.  While my youngest prefers shorts (even in the dead of winter), I convinced her that pants were better because they had more llamas. To complete her pajama set, I used a store tee and added some iron-on with my Cricut.  (Bonus: she can wear the shirt to school too). 

What I say: Time for bed!
What she hears: TIME TO PARTY!!!!
I added pockets because I love pockets and so do my girls.  Plus, how would she smuggle little toys to bed without them?!  

SWEET SUCCESS!!!
This flannel is so comfy, she fell asleep right on the spot! (HA!! If only it were that easy...lol)  But seriously, this flannel is so super soft and sewed so nicely!  I was super happy I could iron throughout the process without changing any of my settings.


My oldest will fall asleep the moment her head hits the pillow which is fantastic as long as I can get her INTO bed.  HA!


 I also made her the Adelaide Pajama pants and paired with a store tee that I embellished.  The Adelaide pattern also come with a cute top, but I wanted to be able to personalize the shirts a bit for their personalities.


She thought she should pretend to go to sleep so you would know the flannel "worked".  After a rather short adventure during bedtime routine tonight, I'll happily say, "yes, yes it does!!"


Don't worry, she's not mad about her new pjs.... she's showing y'all her mad "It's time for bed" face.   She is such a ham in real life and normally reigns it in for most photo shoots, but these pics showcase their personalities perfectly.  (and honestly, I pared down the gazillion expressions she gave me.)


Best sisters.  They really love to coordinate and will be wearing these cute llamas all winter long.  They will probably make an appearance at their elementary school "pj days" too!

Custom Post Signature

Custom Post  Signature